Divers
- Affichage date et heure sur le terminal
- Gérer en série des postes sous Debian-like depuis un poste sous Unix-like
- Installation de l'imprimante SHARP MX-2314N sur Linux
- Installer docker et docker-compose sur RHEL-like
- Mise à jour de NodeJS sous Centos8
- Mise à jour de Scoold sur Heroku
- Remplacer les points dans les noms de fichiers par des espaces
- Script de mise à jour sous Debian-like
- Tmux tips
- Vim Tips 🇬🇧
- Vimtutor Summaries
- VirtualBox - Installer les Additions invité sur une image debian
- Sway Cheatsheet
- Connexion automatique d'un utilisateur sous Debian
Affichage date et heure sur le terminal
Commande showdt
Il d'abord disposer des binaires watch et figlet (à installer).
Par défaut, les polices de figlet sont dans le répertoire /usr/share/figlet/.
On peut y installer la police doh (https://www.figlet.org/fonts/doh.flf)
Puis on peut assigner l'alias :
alias showdt="watch -tn 1 date '+%A\ %d\ %B%n%H\ \ \:\ \ %M\ \:\ \ %S' \| figlet -ct -f doh"
Toutes les secondes la date est raffraîchie et s'affiche au centre du terminal en utilisant toute la largeur disponible.
Lancer dans un tmux
Il faut évidemment que tmux soit installer.
#!/bin/bash

session="big_clock"
window="$session":0

# Create new session but not attached
tmux new-session -d -s "$session"
# Launch showdt alias in the window
tmux send-keys -t "$window" 'showdt' C-m
# Attach the session
tmux -2 attach-session -t "$session"
Mettre à jour l'affichage
Il arrive que l'affichage cafouille (notamment quand le PC est très sollicité), avec un cronjob on peut actualiser l'affichage.
#!/bin/bash

session="big_clock"

# Check if session exists
exist_bg=$(tmux has-session -t "$session" 2>/dev/null)

if [[ "$exist_bg" != 0 ]]; then
  client=$(tmux list-client | sed 's/:/ /g' | awk '/tty/ {print $1}' | awk 'NR==1')
        # Refresh screen
        tmux refresh -t "$client"
        if [[ "$?" != 0 ]]; then
                # Log in /var/log/messages
                logger "Session "$session" NOT reloaded"
                exit 1
        else
#               logger "Session "$session" reloaded"
                exit 0
        fi
else

        exit 1
fi
Gérer en série des postes sous Debian-like depuis un poste sous Unix-like
Installation de Linux Mint
- Télécharger l'ISO de Linux Mint sur le site officiel.
- Copier l'ISO sur une clés USB, un DVD ou une clés Ventoy.
- Procéder à l'installation sur le poste (il faut probablement changer l'amorçage).
Une fois que l'installation est terminé, récupérer l'adresse IP locale (idéalement fixer l'adresse IP depuis le router) :
ip address
1: lo: <LOOPBACK,UP,LOWER_UP> mtu 65536 qdisc noqueue state UNKNOWN group default qlen 1000
    link/loopback 00:00:00:00:00:00 brd 00:00:00:00:00:00
    inet 127.0.0.1/8 scope host lo
       valid_lft forever preferred_lft forever
    inet6 ::1/128 scope host
       valid_lft forever preferred_lft forever
2: enp7s0: <NO-CARRIER,BROADCAST,MULTICAST,UP> mtu 1500 qdisc fq_codel state DOWN group default qlen 1000
    link/ether 40:61:86:1d:40:c6 brd ff:ff:ff:ff:ff:ff
3: wlp6s0: <BROADCAST,MULTICAST,UP,LOWER_UP> mtu 1500 qdisc noqueue state UP group default qlen 1000
    link/ether 1c:4b:d6:75:6d:52 brd ff:ff:ff:ff:ff:ff
    inet 192.168.188.46/24 brd 192.168.188.255 scope global dynamic noprefixroute wlp6s0
       valid_lft 863809sec preferred_lft 863809sec
    inet6 fe80::2803:cab0:e242:aaf5/64 scope link noprefixroute
       valid_lft forever preferred_lft forever
Ici, on note depuis l'interface wlp6s0 que l'adresse IP locale est 192.168.188.46.
Normalement le serveur SSH est installé et activé par défaut, on vérifie :
sudo systemctl status ssh
● ssh.service - OpenBSD Secure Shell server
     Loaded: loaded (/lib/systemd/system/ssh.service; enabled; vendor preset: e>
     Active: active (running) since Mon 2021-09-20 11:32:56 CEST; 7min ago
[…]
Si le processus n'est pas actif, ou si l'on obtient une erreur :
sudo apt install openssh-server -y
sudo systemctl enable ssh
sudo systemctl start ssh
On répète l'opération pour chaque PCs.
Préparations
Fichier DNS
Modifier le fichier /etc/hosts pour y entrer les adresses IP des PCs, exemple :
127.0.0.1   localhost localhost.localdomain localhost4 localhost4.localdomain4
::1         localhost localhost.localdomain localhost6 localhost6.localdomain6

192.168.188.30	mintepn01
192.168.188.45  mintepn06
192.168.188.46  mintepn08
On peut tester la communication avec :
ping -c 4 mintepn08
PING mintepn08 (192.168.188.46) 56(84) octets de données.
64 octets de mintepn08 (192.168.188.46) : icmp_seq=1 ttl=64 temps=2.04 ms
64 octets de mintepn08 (192.168.188.46) : icmp_seq=2 ttl=64 temps=1.82 ms
64 octets de mintepn08 (192.168.188.46) : icmp_seq=3 ttl=64 temps=1.91 ms
64 octets de mintepn08 (192.168.188.46) : icmp_seq=4 ttl=64 temps=3.30 ms

--- statistiques ping mintepn08 ---
4 paquets transmis, 4 reçus, 0% packet loss, time 3129ms
rtt min/avg/max/mdev = 1.822/2.268/3.303/0.602 ms
Si on n'a pas de communication, on vérifie avant de continuer !
Clés SSH
On se connecte un première fois de façon classique en SSH :
ssh epnadm@epn08
Normalement il ajoute le PC dans le fichier ~/.ssh/know_host.
Ensuite on transmet sa clés SSH publique :
ssh-keygen -t rsa # Pour créer la paire de clés SI ce n'est déjà fait
ssh-copy-id epnadm@epn08 # Transfert de clés publique, à faire à chaque PC
Fichier permettant la remise à zéro des données
Créer un fichier rc.local :
#!/bin/sh -e
#
# rc.local
mkdir /tmp/invite
rsync -av /etc/skel/ /tmp/invite
chown invite -R /tmp/invite
[[ -d "/home/invite" ]] || ln -s /tmp/invite /home

exit 0
Ansible sur le PC maître
Installation
Si Ansible n'est pas installé :
sudo dnf install ansible sshpass # Ici sous Fedora / sshpass dans le cas d'une installation un peu ancienne
Fichier hosts de Ansible
Éditer le fichier /etc/ansible/hosts pour y faire figurer les PCs avec les utlisateurs qui vont bien :
[workstations:vars]
ansible_user=epnadm
ansible_become_method=sudo

[workstations]
mintepn01
mintepn06
mintepn08     ansible_user=mickael	ansible_become_pass='{{ another_passwd }}'
Ici, les lignes sont commentés étant donné que le nom d'utilisteur est mis en variable globale.
On peut faire un test de communication :
ansible -m ping workstations
[WARNING]: Platform linux on host mintepn08 is using the discovered Python
interpreter at /usr/bin/python3, but future installation of another Python
interpreter could change this. See https://docs.ansible.com/ansible/2.9/referen
ce_appendices/interpreter_discovery.html for more information.
mintepn08 | SUCCESS => {
    "ansible_facts": {
        "discovered_interpreter_python": "/usr/bin/python3"
    },
    "changed": false,
    "ping": "pong"
}
mintepn06 | SUCCESS => {
    "ansible_facts": {
        "discovered_interpreter_python": "/usr/bin/python3"
    },
    "changed": false,
    "ping": "pong"
}
Fichier de secrets
Créer un fichier contenant le mot de passe de l'utilisateur ayant des droits sudo sur les PCs :
ansible-vault create secret
Pour séparer les clés des valeurs, il doit y avoir une espace ou une tabulation après : :
ansible_become_pass:	<mot de passe utilisateur>
another_passwd:			<un autre mot de passe>
Script Ansible
---
- name: Installs
  become: yes
  hosts: all
  vars:
    ansible_python_interpreter: /usr/bin/python3
  vars_files:
  - secret

  tasks:
    - name: Update & Upgrade
      apt:
        update_cache: yes
        upgrade: 'yes'
    - name: Add APT Key Ubuntu
      apt_key:
        keyserver: keyserver.ubuntu.com
        id: 83FBA1751378B444
    - name: Add LibreOffice repo
      apt_repository:
        validate_certs: no
        repo: 'deb http://ppa.launchpad.net/libreoffice/ppa/ubuntu focal main'
        state: present
      register: repolo
    - name: Update & Upgrade for LibreOffice
      apt:
        update_cache: yes
        upgrade: 'yes'
      when: repolo.changed
    - name: Automatic upgrade
      ansible.builtin.shell:
        cmd: mintupdate-automation upgrade enable
    - name: Install packages
      apt:
        pkg:
        - gimp
        - vim
        - bat
        - chromium
        - inkscape
        - gcompris
        - kmines
      state: latest
      update_cache: no
    - name: Create user 'Invité'
      ansible.builtin.user:
        name: invite
        comment: Invité
        uid: 1001
        append: yes
        groups: adm,dialout,fax,cdrom,floppy,tape,audio,dip,video,plugdev,netdev,nopasswdlogin
        create_home: no
        home: /home/invite
    - name: Remove invite's home directory
      file:
        path: /home/invite
        state: absent
    - name: Copy rc.local
      ansible.builtin.copy:
        src: ./Data/rc.local
        dest: /etc/rc.local
        owner: root
        group: root
        mode: '0711'
      register: cprclocal
    - name: Unconditionally reboot the machine with all defaults
      reboot:
      when: cprclocal.changed
Déplacer le fichier précédemment créé rc.local dans le dossier Ansible/Data.
Lancer le script Ansible :
ansible-playbook ~/Documents/Ansible/PB_install_mint.yml --ask-vault-pass
Patientre le temps du déroulement.
Tips
Pour rajouter des applications sur tous les postes, il suffit d'entrer le nom du paquet à la suite de pkg dans le script Ansible, puis de relancer le script.
En cas de dysfonctionnement dans la réintialisation du compte Invité, jeter un œil ici.
Installation de l'imprimante SHARP MX-2314N sur Linux
Aller sur le site de sharp.be pour sélectionner les pilotes d'imprimante sur Linux : lien ici.
Télécharger le driver PS/PPD.
Extraire successivement toutes les archives pour arriver au fichier Sharp-MX-2314N-ps.ppd
Modifier le fichier suivant les indications d'après le forum :
Put it right before all of the %== constraints lists and options.
*% **** Account number
*JCLOpenUI *JCLMXaccount/numero: PickOne
*OrderDependency: 80 JCLSetup *JCLMXaccount
*DefaultJCLMXaccount: A#####
*JCLMXaccount A#####/#####: "@PJL SET ACCOUNTNUMBER=<22>#####<22><0A>"
*JCLCloseUI: *JCLMXaccount
Make ##### your user number.
S'il faut une identification par username & password, se référer à ce lien.
Ajouter l'imprimante avec Configuration d'imprimante du gestionnaire d'application.
Sélectionner le fichier .pdd modifié.
Source pour gérer les imprimantes sous Manjaro ici et bonus pour gérer cups.
Source ayant inspiré la démarche : ici sur linuxfr.org.
Alternativement, il y a également une page de drivers ici.
Installer docker et docker-compose sur RHEL-like
Docker
sudo dnf config-manager --add-repo=https://download.docker.com/linux/centos/docker-ce.repo
sudo dnf install docker-ce docker-ce-cli containerd.io
Régler les droits de l'utilisateur :
sudo groupadd docker # Si il n'existe pas encore
sudo usermod -aG docker $USER
Source : How to Install Docker and Docker Compose on CentOS 8 Serverspace.
Docker-compose
Télécharger le binaire dans le bon dossier
sudo curl -L "https://github.com/docker/compose/releases/download/$(curl --silent https://api.github.com/repos/docker/compose/releases/latest | grep -Po '"tag_name": "\K.*\d')/docker-compose-$(uname -s)-$(uname -m)" -o /usr/local/bin/docker-compose
Rendre le binaire exécutable
sudo chmod 755 /usr/local/bin/docker-compose
Mettre à jour
Comme pour l'installation…
Mise à jour de NodeJS sous Centos8
Vérification de la version installée et/ou disponible
On vérifie la version installer.
$ node -v
v10.24.0
On peut noter que la version installée est la 10.24, or la version lts actuelle est la 14.xx.
On vérifie les infos auprès des dépôts actuels.
$ dnf info nodejs
[…]
Paquets installés
Nom          : nodejs
Époque       : 1
Version      : 10.24.0
Publication  : 1.module_el8.3.0+717+fa496f1d
Architecture : x86_64
Taille       : 30 M
Source       : nodejs-10.24.0-1.module_el8.3.0+717+fa496f1d.src.rpm
Dépôt        : @System
Depuis le dé : appstream
Résumé       : JavaScript runtime
URL          : http://nodejs.org/
Licence      : MIT and ASL 2.0 and ISC and BSD
Description  : Node.js is a platform built on Chrome’s JavaScript runtime
             : for easily building fast, scalable network applications.
             : Node.js uses an event-driven, non-blocking I/O model that
             : makes it lightweight and efficient, perfect for data-intensive
             : real-time applications that run across distributed devices.
On constate que les dépôts présentent la même version.
Les modules
On liste les modules proposant NodeJS.
$ dnf module list nodejs
Dernière vérification de l’expiration des métadonnées effectuée il y a 0:02:18 le lun. 17 mai 2021 12:54:48 CEST.
CentOS Linux 8 - AppStream
Name          Stream           Profiles                                     Summary
nodejs        10 [d][e]        common [d], development, minimal, s2i        Javascript runtime
nodejs        12               common [d], development, minimal, s2i        Javascript runtime
nodejs        14               common [d], development, minimal, s2i        Javascript runtime

Extra Packages for Enterprise Linux Modular 8 - x86_64
Name          Stream           Profiles                                     Summary
nodejs        13               default, development, minimal                Javascript runtime

Aide : [d]éfaut, [e]activé, [x]désactivé, [i]nstallé
On peut noter que AppStream propose 3 versions différents, dont un version 14.
On opère un reset de NodeJS auprès des modules, d'après le manuel :
dnf [options] module reset <module-name>...
              Reset module state so it’s no longer enabled or disabled.
              Consequently, all installed profiles will be removed and only RPMs
              from the default stream  will  be available in the package set.
$ sudo dnf module reset nodejs
Dernière vérification de l’expiration des métadonnées effectuée il y a 2:24:41 le lun. 17 mai 2021 10:37:09 CEST.
Dépendances résolues.
====================================================================================================
 Paquet                 Architecture          Version                  Dépôt                  Taille
====================================================================================================
Réinitialisation des modules:
 nodejs

Résumé de la transaction
====================================================================================================

Voulez-vous continuer ? [o/N] : o
Terminé !
On rend opérationnel NodeJS v.14 auprès des modules.
$ sudo dnf module enable nodejs:14
Dernière vérification de l’expiration des métadonnées effectuée il y a 2:25:11 le lun. 17 mai 2021 10:37:09 CEST.
Dépendances résolues.
====================================================================================================
 Paquet                 Architecture          Version                  Dépôt                  Taille
====================================================================================================
Activation des flux de modules:
 nodejs                                       14

Résumé de la transaction
====================================================================================================

Voulez-vous continuer ? [o/N] : o
Terminé !
Finalisation
On met à jour les paquets !
$ sudo dnf upgrade
Dernière vérification de l’expiration des métadonnées effectuée il y a 2:25:27 le lun. 17 mai 2021 10:37:09 CEST.
Dépendances résolues.
====================================================================================================
 Paquet             Architecture
                             Version                                              Dépôt       Taille
====================================================================================================
Mise à jour:
 nodejs             x86_64   1:14.16.0-2.module_el8.3.0+719+59eb7cbb              appstream    11 M
 nodejs-full-i18n   x86_64   1:14.16.0-2.module_el8.3.0+719+59eb7cbb              appstream   7.5 M
 npm                x86_64   1:6.14.11-1.14.16.0.2.module_el8.3.0+719+59eb7cbb    appstream   3.7 M
Installation des dépendances faibles:
 nodejs-docs        noarch   1:14.16.0-2.module_el8.3.0+719+59eb7cbb              appstream   7.9 M

Résumé de la transaction
====================================================================================================
Installer        1 Paquet
Mettre à niveau  3 Paquets

Taille totale des téléchargements : 30 M
Voulez-vous continuer ? [o/N] : o
Téléchargement des paquets :
(1/4): nodejs-full-i18n-14.16.0-2.module_el8.3.0+719+59eb7cbb.x86_6 7.2 MB/s | 7.5 MB     00:01
(2/4): nodejs-docs-14.16.0-2.module_el8.3.0+719+59eb7cbb.noarch.rpm 7.0 MB/s | 7.9 MB     00:01
(3/4): npm-6.14.11-1.14.16.0.2.module_el8.3.0+719+59eb7cbb.x86_64.r 9.2 MB/s | 3.7 MB     00:00
(4/4): nodejs-14.16.0-2.module_el8.3.0+719+59eb7cbb.x86_64.rpm      6.7 MB/s |  11 MB     00:01
----------------------------------------------------------------------------------------------------
Total                                                                15 MB/s |  30 MB     00:01

[…]

Mis à niveau:
  nodejs-1:14.16.0-2.module_el8.3.0+719+59eb7cbb.x86_64
  nodejs-full-i18n-1:14.16.0-2.module_el8.3.0+719+59eb7cbb.x86_64
  npm-1:6.14.11-1.14.16.0.2.module_el8.3.0+719+59eb7cbb.x86_64

Installé:
  nodejs-docs-1:14.16.0-2.module_el8.3.0+719+59eb7cbb.noarch

Terminé !
On peut constater que la version est bien mise à jour.
$ node -v
v14.16.0
Source ici.
Mise à jour de Scoold sur Heroku
Github : Erudika/scoold - https://github.com/Erudika/scoold.
Déploiment Heroku : https://heroku.com/deploy?template=https://github.com/Erudika/scoold.
Se rendre dans le dossier du repo
cd ~/Documents\ autres/epn-scoold/
Tirer les modifications
git pull origin master
Pousser les modifications
git push heroku master
Remplacer les points dans les noms de fichiers par des espaces
Simplement :
find . -iname '*.<ext>' -exec rename -v 's/(?!^)\.(?!<ext>$)/ /g' {} \;
En remplaçant <ext> par l'extension fichier.
Mais encore faut-il s'en rappeler…
Script de mise à jour sous Debian-like

#!/bin/bash

txt_path=/home/"$1"/.config/system_update.txt
date_now=$(date)
declare -i date_char=$(( $(echo "$date_now" | wc -c) + 3 ))
date_stars=$(printf '*%.0s' $(seq 1 "$date_char" ))
echo "$date_stars" > "$txt_path"
echo "* $date_now *" >> "$txt_path"
echo "$date_stars" >> "$txt_path"
echo "" >> "$txt_path"
echo " Clean " >> "$txt_path"
echo " Clean "
echo "*******" >> "$txt_path"
apt-get clean >> "$txt_path"
echo "" >> "$txt_path"
echo " Autoclean " >> "$txt_path"
echo " Autoclean "
echo "***********" >> "$txt_path"
apt-get autoclean >> "$txt_path"
echo "" >> "$txt_path"
echo " Update " >> "$txt_path"
echo " Update "
echo "********" >> "$txt_path"
apt-get update >> "$txt_path"
echo "" >> "$txt_path"
echo " Upgrade " >> "$txt_path"
echo " Upgrade "
echo "*********" >> "$txt_path"
apt-get upgrade -y >> "$txt_path"
echo "" >> "$txt_path"
echo " Autoremove " >> "$txt_path"
echo " Autoremove "
echo "************" >> "$txt_path"
apt-get autoremove >> "$txt_path"
chown "$1":"$1" "$txt_path"
Tmux tips
Astuces
Lister les sessions actives
tmux ls
Renommer la session
<c-b> $
Puis on entre le nom voulu.
Attacher une session existante
tmux attach-session -t 0
Ou, pour attacher à la dernière session :
tmux attach
Où 0 est le nom de la session.
Détacher de la session
<c-b> d
Redimensionner le terminal d'après le moniteur le plus grand
<c-b>:resize-window -A
Autres paramètres utiles pour resize-window (resizew) :
-
-a: redimensionner à la taille de la plus petite session. -
-U,-D,-Let-R: ajuster le haut, le bas, à gauche ou à droite. Peut-être suivi par un nombre afin de déterminer de combien grossir (-Det-R) ou réduire (-Uet-L). -
-x <width>et/ou-y <height>pour paramétrer la largeur et la hauteur aux valeurs données.
Afficher l'aide
<c-b> ?
Pour rechercher du texte dans l'aide :
<c-s>
Sources
tmux(1) terminal multiplexer - Linux man page
List of 50+ tmux cheatsheet and shortcuts commands GoLinuxCloud.
Show_available_Options.
Read The Tao of tmux.
Tmux Scripting
Vim Tips 🇬🇧
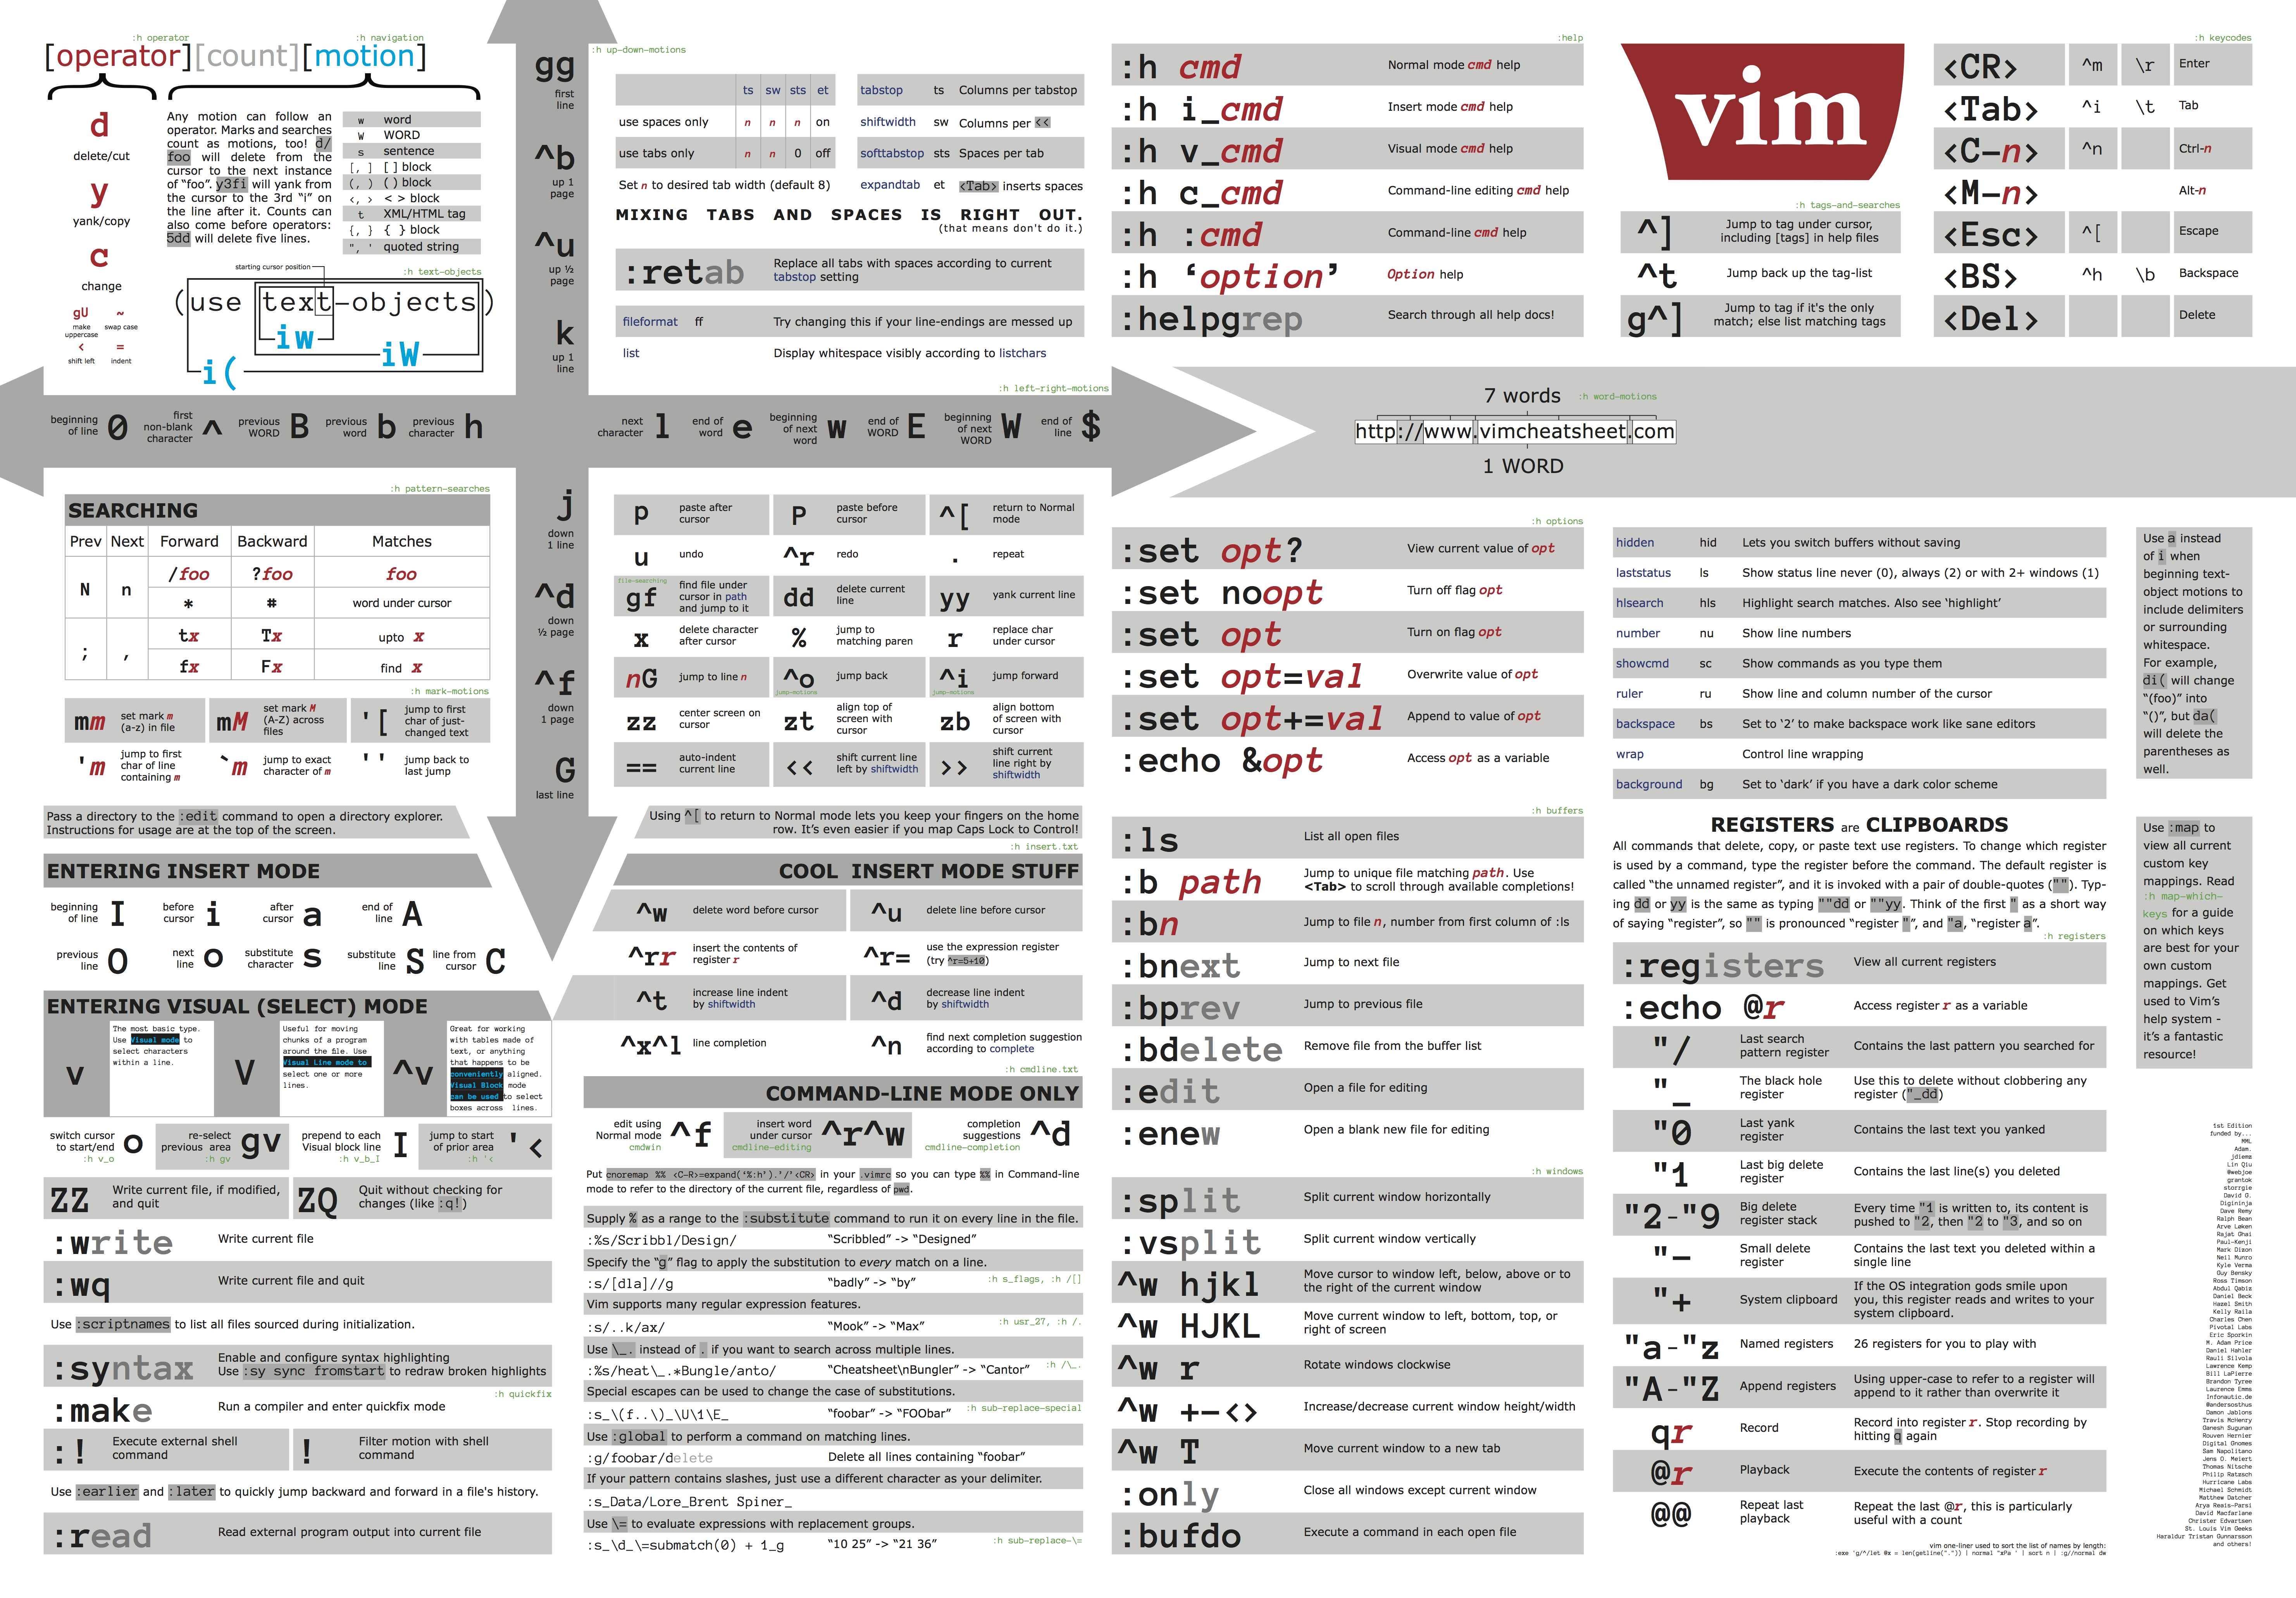
91 Vim Keyboard Shortcuts to Get Started with Vim - Tech Inscribed
Source: 91 Vim Keyboard Shortcuts to Get Started with Vim - Tech Inscribed.
This article gives you a list of most commonly used Vim keyboard shortcuts that can help you get started with Vim.
Modes
Vim has multiple modes namely Normal mode, Insert mode, Replace mode, and Visual mode.
Normal mode is where you can use most of the shortcuts. In insert mode, Vim behaves like a normal text editor. In replace mode, existing texts are replaced or overwritten as you type. Visual mode allows us to select texts visually and then make changes to it.
i |
Insert mode at the cursor. |
I |
Insert mode at the beginning of the line. |
a |
Insert mode after the cursor. |
A |
Insert mode at the end of the line. |
o |
Insert mode with a new line below. |
O |
Insert mode with a new line above. |
s |
Insert mode at the cursor, after deleting the current character. |
S |
Insert mode, after deleting the current line. |
v |
Visual mode at the cursor. |
V |
Visual mode at the beginning of the line. |
r |
Replace mode to replace the current character. |
R |
Replace mode. |
Esc |
Normal Mode or Command Mode. |
Motion or Movement
Motions are a set of shortcut keys that allow us to quickly move around the text document.
k |
Move one line up. |
j |
Move one line down. |
h |
Move one line left. |
l |
Move one line right. |
w |
Go to the beginning of the next word (separated by space/punctuation). |
W |
Go to the beginning of the next word separated by space. |
e |
Go to the end of the next word separated by punctuations/space. |
E |
Go to the end of the next word separated by space. |
b |
Go to the beginning of the previous word separated by punctuation/space. |
B |
Go to the beginning of the previous word separated by space. |
{ |
Go to the previous line break. |
} |
Go to the next line break. |
% |
Go to matching Bracket. |
# |
Go to the previous occurrence of the current word under the cursor. |
* |
Go to the next occurrence of the current word under the cursor. |
^ |
Go to the first non-empty character in the line. |
0 |
Go to the beginning of the line. |
$ |
Go to the end of the line. |
gg |
Go to the beginning of the file. |
G |
Go to the end of the file. |
gd |
Go to definition. |
:{number} |
Go to the line number. Note: This is not really a shortcut but a Vim command. |
Motion shortcuts can be prefixed with a number to repeat the motion. For example, to move 5 lines down, we can use 5j. Similarly, to move 2 words forward, we can use 2w.
Also Read: How to Set up Vim as an IDE for React and TypeScript in 2020
Searching
You can search for a character in the current line using find f and till t.
The difference between “find” and “till” is that “find” moves the cursor to the searched character, whereas “till” moves the cursor to the previous character of the searched character.
f |
Find the next occurrence of a character in the current line and go to it. |
t |
Find the next occurrence of a character in the current line and go to its previous character. |
F |
Find the previous occurrence of a character in the current line and go to it. |
T |
Find the previous occurrence of a character in the current line and go to its next character. |
To search for a phrase, you can use Vim command / or ?
/{search-word} |
Search for a word forward. For example /export will search and find the next instance of the word “export”. |
?{search-word} |
Search for a word backward. For example /export will search and find the previous instance of the word “export”. |
After searching, n and N can be used to find next and previous occurrences respectively.
n |
Find the next occurrence. To be used after using / or ? |
N |
Find the previous occurrence. To be used after using / or ? |
Deleting
Delete(d) is an operator in Vim. Operators cannot function without motion and henced is always followed by a motion. Here, the motion is what tells Vim what to delete.
That being said, you can combine all motions with d, like so.
dw |
Delete from current character to end of a word(space/punctuation/EOL). |
dW |
Delete from current character to end of a word (space/EOL). |
db |
Delete from current character to beginning of a word(space/punctuation/EOL). |
dB |
Delete from current character to beginning of a word(space/EOL). |
diw |
Delete the current word. |
diW |
Delete the current word. |
dd |
Delete the current line. |
di' |
Delete everything within the single quotes. |
di" |
Delete everything within the double-quotes. |
di( |
Delete everything within the brackets. |
di{ |
Delete everything within the curly braces. |
di[ |
Delete everything within the square brackets. |
x |
Delete the current character under the cursor. |
X |
Delete the previous character. |
You can also repeat these commands by prefixing a number. For example, you can delete 5 lines using 5dd or d4j
Changing
In Vim, changing is similar to delete, the only difference is that after deleting, insert mode gets activated.
cw |
Delete from current character to end of a word(space/punctuation/EOL) and then go to insert mode. |
cW |
Delete from current character to end of a word (space/EOL) and then go to insert mode. |
cb |
Delete from current character to beginning of a word(space/punctuation/EOL) and then go to insert mode. |
cc |
Change the current line. |
cB |
Change the current block. |
ciw |
Change inside a word. |
ciW |
Change inside a word. |
ci' |
Change everything inside a pair of single quotes. |
ci" |
Change everything inside a pair of double-quotes. |
ci( |
Change everything inside a pair of parentheses. |
ci{ |
Change everything inside a pair of curly braces. |
ci[ |
Change everything inside a pair of square brackets. |
s |
Delete the current character and go to insert mode. |
S |
Delete the current line and go to insert mode. |
>> |
Indent current line. |
<< |
Unindent current line. |
Copy(Yank) and Paste
yy |
Copy the current line |
yw |
Copy the current word from cursor till space/punctuation |
yW |
Copy the current word from cursor till space. |
yiw |
Copy the current word. |
yiB |
Copy the block. |
yi' |
Copy everything inside a pair of single quotes. |
yi" |
Copy everything inside a pair of double-quotes. |
yi( |
Copy everything inside a pair of parentheses. |
yi{ |
Copy everything inside a pair of curly braces. |
yi[ |
Copy everything inside a pair of square brackets. |
p |
Paste below the current line. |
P |
Paste above the current line. |
When a text is yanked, it goes into Vim registers and Vim has many registers. You can see contents present in all the Vim registers by running the Vim command :reg.
To yank a text to a particular register, you can prefix the yank command with "{register}. For example, to yank the text to register “1”, you can use the shortcut "1yy.
Similarly, you can paste the contents of a particular register. For example, "2p will paste the content present in register “2”.
Undo and Redo
u |
Undo the last action. |
U |
Redo the last action. |
These commands can be repeated by prefixing a number. For example, to undo last 3 actions, you can use 3u.
Toggling Case
~ |
Toggle case at the current cursor position. |
gUU |
Make current line uppercase. |
guu |
Make current line lowercase. |
You can also use gu and gU with a motion. For example, to convert 3 lines to uppercase, you can use gU3j.
Repeat Last Change
. |
Repeats the last change. |
This is where the real power of Vim comes in. For example, say you need to replace all occurrences of a word. You can first search for the word using / or ?. Then to change the word you can use ciw. After changing go back to Normal mode, hit n to go to the next occurrence. Now you can simply press . to replace the word.
What’s Next?
Once you get hold of these Vim keyboards shortcuts, open Vim and run the command :help to open the Vim documentation or you can use the online version of Vim documentation. It provides a list of every command there is with an explanation. So, you can pick up a few more useful Vim shortcuts and also get a better understanding.
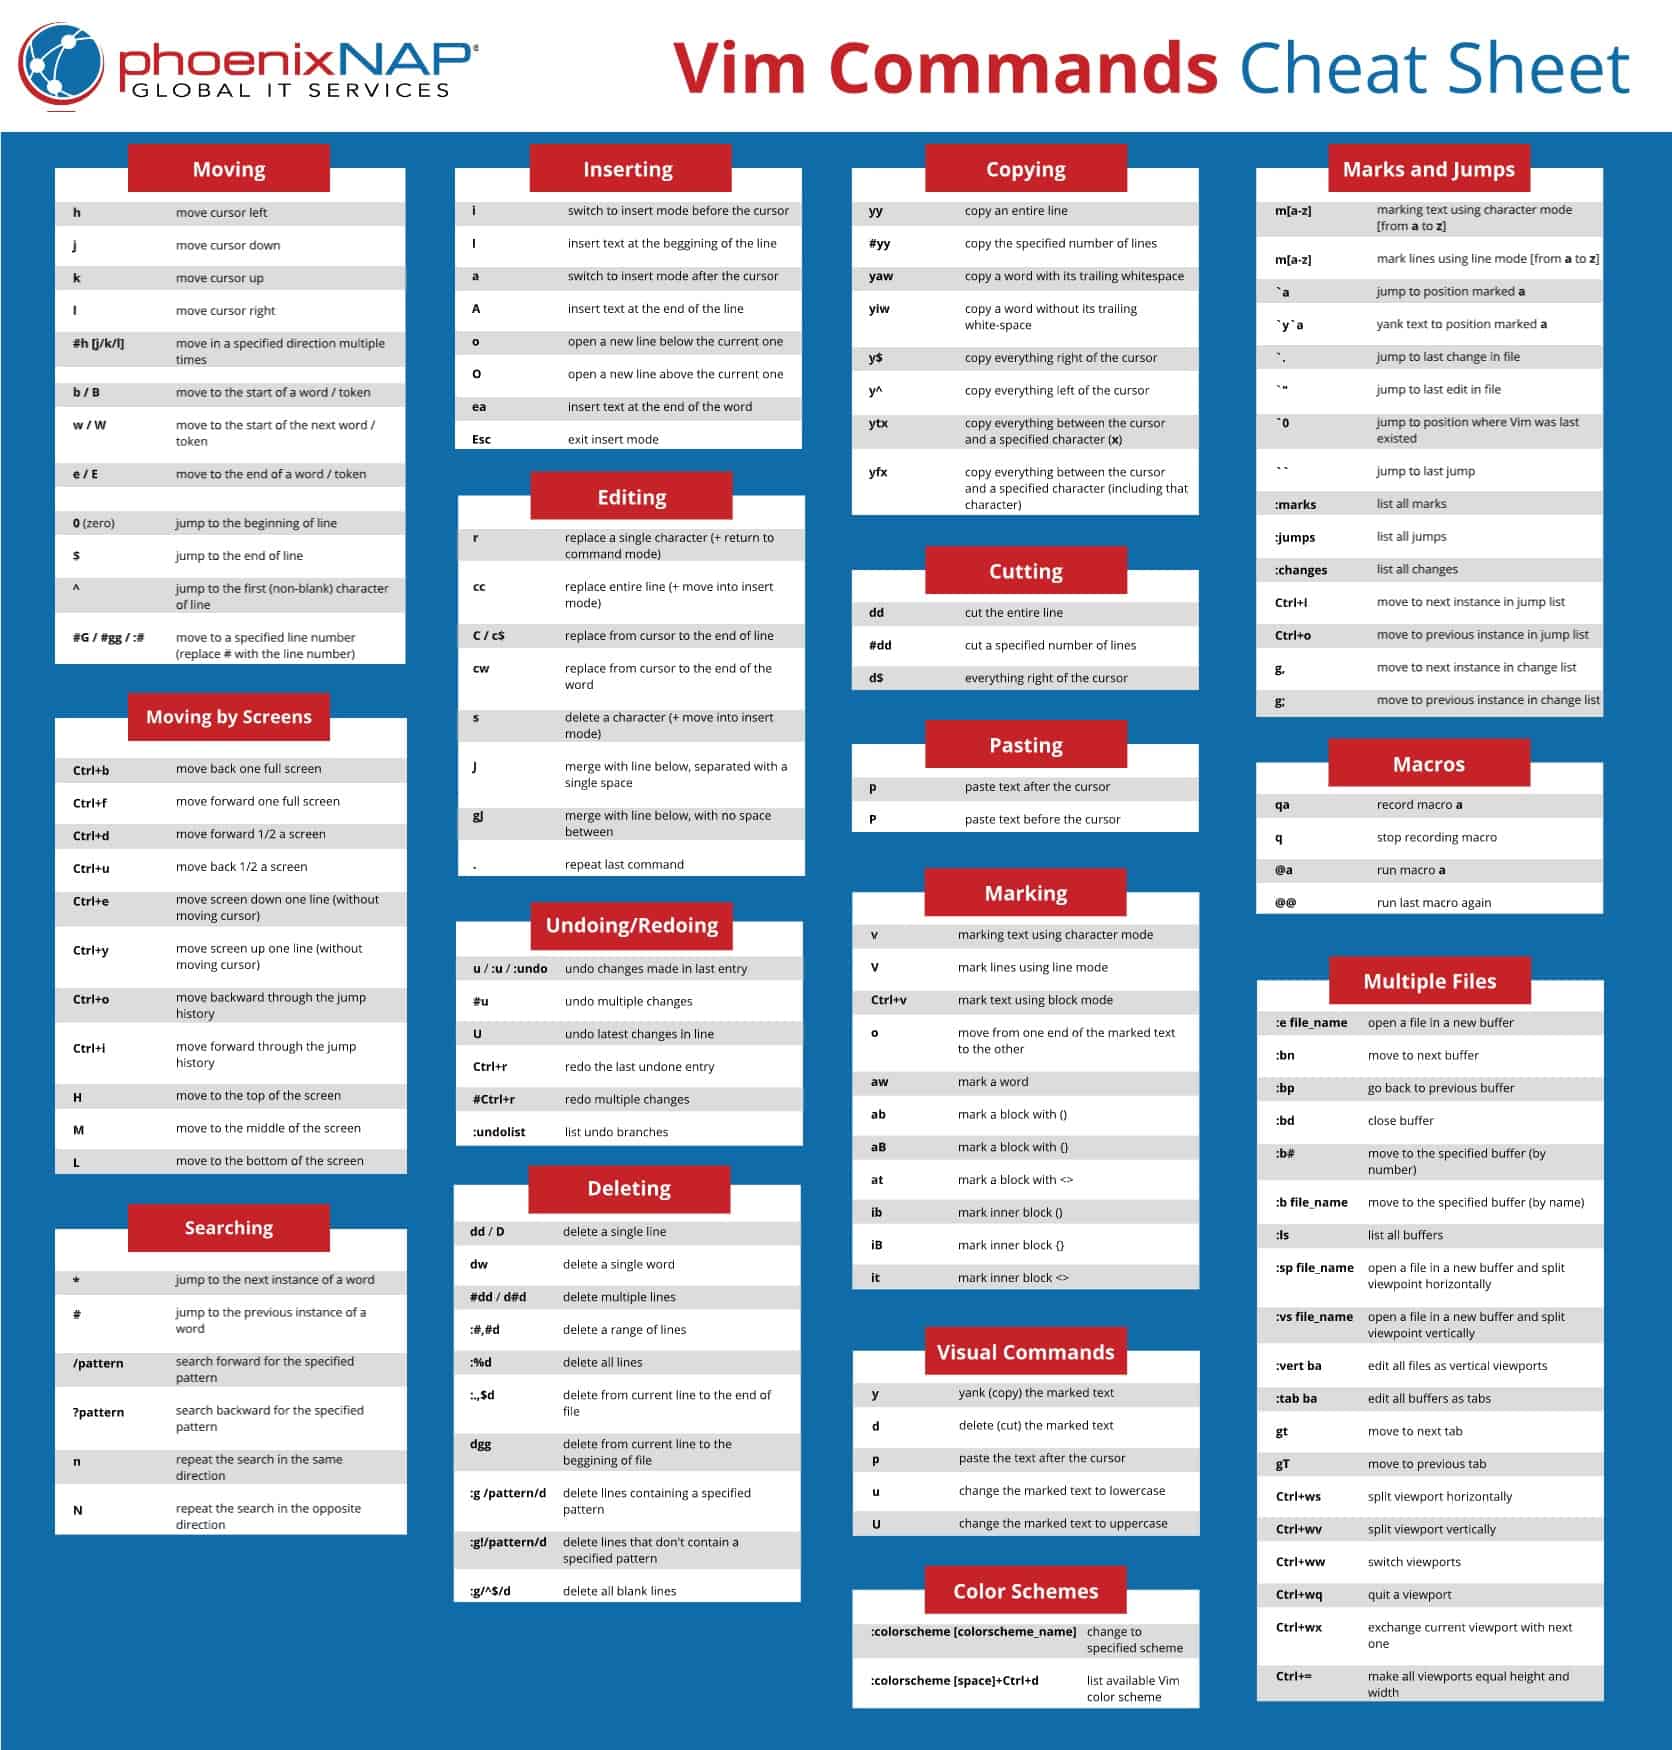
Vim Commands Cheat Sheet
Source: Vim Commands Cheat Sheet .
Introduction
Vim is a widely used, open-source Unix text editor. Learning to use Vim commands is a matter of practice and experience. That is why it is handy to have a helpful reference sheet while mastering them.
In this tutorial, you will find the most important Vim commands as well as a downloadable cheat sheet.
Moving Inside a File
You can move the cursor within a file by single characters, words, tokens, or lines.
According to Vim, a word can be a group of letters, numbers, and underscores. On the other hand, a token is anything separated by whitespace and can include punctuation.
Additionally, you can move to different parts of a text by screen view.
Moving by Characters, Words and Tokens
The basic keys for moving the cursor by one character are:
-
h– move the cursor left -
j– move the cursor down -
k– move the cursor up -
l– move the cursor right
You can also use these keys with a number as a prefix to move in a specified direction multiple times. For example, if you run 5j the cursor moves down 5 lines.
-
b– move to the start of a word -
B– move to the start of a token -
w– move to the start of the next word -
W– move to the start of the next token -
e– move to the end of a word -
E– move to the end of a token
For instance, you have the noun phrase “step-by-step” as part of a text and the cursor is placed at the end of it. The first time you press b, the cursor moves back to “step-by-step”. However, if you use B, the cursor moves all the way back to: “step-by-step” since there is no whitespace between these characters.
Moving by Lines
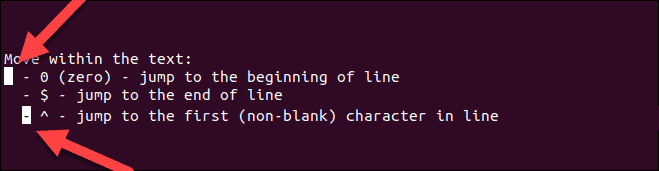
-
0(zero) – jump to the beginning of the line -
$– jump to the end of the line -
^– jump to the first (non-blank) character of the line -
#G/#gg/:#– move to a specified line number (replace # with the line number)
To illustrate the difference between 0 and ^, take a look at the following example. In the first bullet, the command moves the cursor to the blank space before the bullet. On the other hand, in the third bullet, the ^ key moves the cursor to the hyphen (the first character in the line).
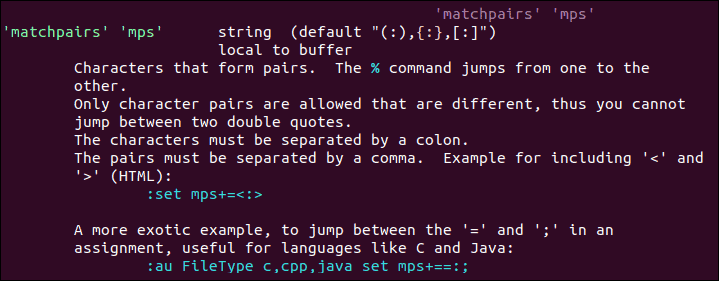
To learn more about matchpairs and how to use more than the default supported pairs, run the following commands in the text editor: :h matchpairs.
Moving by Screens
The following commands are used as a quick way to move within the text without scrolling.
-
Ctrl + b– move back one full screen -
Ctrl + f– move forward one full screen -
Ctrl + d– move forward 1/2 a screen -
Ctrl + u– move back 1/2 a screen -
Ctrl + e– move screen down one line (without moving the cursor) -
Ctrl + y– move screen up one line (without moving the cursor) -
Ctrl + o– move backward through the jump history -
Ctrl + i– move forward through the jump history -
H– move to the top of the screen (H=high) -
M– move to the middle of the screen (M=middle) -
L– move to the bottom of the screen (L=low)
Inserting Text
-
i– switch to insert mode before the cursor -
I– insert text at the beginning of the line -
a– switch to insert mode after the cursor -
A– insert text at the end of the line -
o– open a new line below the current one -
O– open a new line above the current one -
ea– insert text at the end of the word -
Esc– exit insert mode; switch to command mode
Some of these commands switch between command and insert mode. By default, Vim launches in command mode, allowing you to move around and edit the file. To switch to command mode, use the Esc key.
On the other hand, the insert mode enables you to type and add text into the file. To move to insert mode, press i.

Editing Text
-
r– replace a single character (and return to command mode) -
cc– replace an entire line (deletes the line and moves into insert mode) -
C/c$– replace from the cursor to the end of a line -
cw– replace from the cursor to the end of a word -
s– delete a character (and move into insert mode) -
J– merge the line below to the current one with a space in between them -
gJ– merge the line below to the current one with no space in between them -
u– undo -
Ctrl+r– redo -
.– repeat last command
Note: Bear in mind that Vim undoes and redoes changes by entries (changes made within one insert mode session). For more details, refer to the article How to Undo and Redo Changes in Vim.
Cutting, Copying And Pasting
-
yy– copy (yank) entire line -
#yy– copy the specified number of lines -
dd– cut (delete) entire line -
#dd– cut the specified number of lines -
p– paste after the cursor -
P– paste before the cursor
Marking Text (Visual Mode)
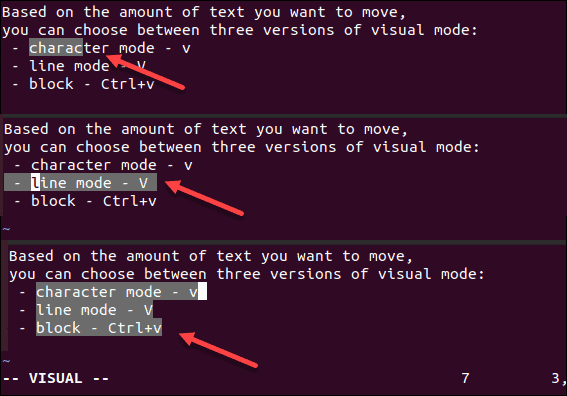
Apart from command mode and insert mode, Vim also includes visual mode. This mode is mainly used for marking text.
Based on the chunk of text you want to select, you can choose between three versions of visual mode: character mode, line mode, and block mode.
-
v– select text using character mode -
V– select lines using line mode -
Ctrl+v– select text using block mode
Once you have enabled one of the modes, use the navigation keys to select the desired text.
-
o– move from one end of the selected text to the other -
aw– select a word -
ab– select a block with () -
aB– select a block with {} -
at– select a block with <> -
ib– select inner block with () -
iB– select inner block with {} -
it– select inner block with <>
Visual Commands
Once you have selected the desired text in visual mode, you can use one of the visual commands to manipulate it. Some of them include:
-
y– yank (copy) the marked text -
d– delete (cut) the marked text -
p– paste the text after the cursor -
u– change the market text to lowercase -
U– change the market text to uppercase
Search in File
-
*– jump to the next instance of the current word -
#– jump to previous instance of the current word -
/pattern– search forward for the specified pattern -
?pattern– search backward for the specified pattern -
n– repeat the search in the same direction -
N– repeat the search in the opposite direction
Saving and Exiting File
-
:w– save the file -
:wq/:x/ZZ– save and close the file -
:q– quit -
:q!/ZQ– quit without saving changes -
:w new_file_name– save the file under a new name and continue editing the original -
:sav– save the file under a new name and continue editing the new copy -
:w !sudo tee %– write out the file using sudo and tee command
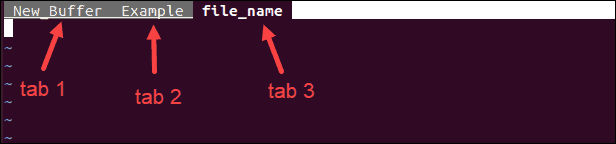
Working with Multiple Files
-
:e file_name– open a file in a new buffer -
:bn– move to the next buffer -
:bp– go back to previous buffer -
:bd– close buffer -
:b#– move to the specified buffer (by number) -
:b file_name– move to a buffer (by name) -
:ls– list all open buffers

-
:sp file_name– open a file in a new buffer and split viewport horizontally -
:vs file_name– open a file in a new buffer and split viewport vertically -
:vert ba– edit all files as vertical viewports -
:tab ba– edit all buffers as tabs -
gt– move to next tab -
gT– move to previous tab
-
Ctrl+ws– split viewport -
Ctrl+wv– split viewport vertically -
Ctrl+ww– switch viewports -
Ctrl+wq– quit a viewport - Ctrl+wx – exchange current viewport with next one
-
Ctrl+=– make all viewports equal in height and width
Marks and Jumps
-
m[a-z]– mark text using character mode (fromatoz) -
M[a-z]– mark lines using line mode (fromatoz) -
`a- jump to position markeda -
`y`a– yank text to position marked >a> -
`.– jump to last change in file -
`0– jump to position where Vim was last exited -
``– jump to last jump -
:marks– list all marks -
:jumps– list all jumps -
:changes– list all changes -
Ctrl+i– move to next instance in jump list -
Ctrl+o– move to previous instance in jump list -
g,– move to next instance in change list -
g;– move to previous instance in change list
Macros
-
qa– record macroa -
q– stop recording macro -
@a– run macroa -
@@– run last macro again
Enabling Vim Color Schemes
-
:colorscheme [colorscheme_name]– change to specified scheme -
:colorscheme [space]+Ctrl+d– list available Vim color scheme
The list of Vim color schemes shows you the ones that come by default with the text editor, as in the image below:

You can also configure the color settings manually or download user-made schemes. Find out how to do so in How to Change and Use Vim Color Schemes.
This article includes a one-page Vim commands reference sheet. Save the cheat sheet in PDF format by clicking the Download Cheat Sheet button below.
Conclusion
Knowing basic Vim commands is useful as most Linux distributions have it installed by default. Once you get use to using Vim commands, mastering Vim should be simple.
Until then, keep a Vim cheat sheet at hand.
Vimtutor Summaries
Source Vim Tutorial for Beginners vimtutor - SysTutorials.
   ** To move the cursor, press the h,j,k,l keys as indicated. **
         ^
         k          Hint:  The h key is at the left and moves left.
       < h   l >           The l key is at the right and moves right.
         j             The j key looks like a down arrow.
         v
  1. Move the cursor around the screen until you are comfortable.

  2. Hold down the down key (j) until it repeats.
     Now you know how to move to the next lesson.

  3. Using the down key, move to Lesson 1.2.

NOTE: If you are ever unsure about something you typed, press <ESC> to place
      you in Normal mode.  Then retype the command you wanted.

NOTE: The cursor keys should also work.  But using hjkl you will be able to
      move around much faster, once you get used to it.  Really!
Lesson 1 SUMMARY
  1. The cursor is moved using either the arrow keys or the hjkl keys.
     h (left)   j (down)       k (up)       l (right)

  2. To start Vim from the shell prompt type:  vim FILENAME <ENTER>

  3. To exit Vim type:     <ESC>   :q!   <ENTER>  to trash all changes.
         OR type:      <ESC>   :wq   <ENTER>  to save the changes.

  4. To delete the character at the cursor type:  x

  5. To insert or append text type:
     i   type inserted text   <ESC>     insert before the cursor
     A   type appended text   <ESC>         append after the line

NOTE: Pressing <ESC> will place you in Normal mode or will cancel
      an unwanted and partially completed command.

Now continue with Lesson 2.
Lesson 2 SUMMARY
  1. To delete from the cursor up to the next word type:    dw
  2. To delete from the cursor to the end of a line type:    d$
  3. To delete a whole line type:    dd

  4. To repeat a motion prepend it with a number:   2w
  5. The format for a change command is:
               operator   [number]   motion
     where:
       operator - is what to do, such as  d  for delete
       [number] - is an optional count to repeat the motion
       motion   - moves over the text to operate on, such as  w (word),
          $ (to the end of line), etc.

  6. To move to the start of the line use a zero:  0

  7. To undo previous actions, type:           u  (lowercase u)
     To undo all the changes on a line, type:  U  (capital U)
     To undo the undo's, type:             CTRL-R
Lesson 3 SUMMARY
  1. To put back text that has just been deleted, type   p .  This puts the
     deleted text AFTER the cursor (if a line was deleted it will go on the
     line below the cursor).

  2. To replace the character under the cursor, type   r   and then the
     character you want to have there.

  3. The change operator allows you to change from the cursor to where the
     motion takes you.  eg. Type  ce  to change from the cursor to the end of
     the word,  c$  to change to the end of a line.

  4. The format for change is:

     c   [number]   motion

Now go on to the next lesson.
Lesson 4 SUMMARY
  1. CTRL-G  displays your location in the file and the file status.
             G  moves to the end of the file.
     number  G  moves to that line number.
            gg  moves to the first line.

  2. Typing  /  followed by a phrase searches FORWARD for the phrase.
     Typing  ?  followed by a phrase searches BACKWARD for the phrase.
     After a search type  n  to find the next occurrence in the same direction
     or  N  to search in the opposite direction.
     CTRL-O takes you back to older positions, CTRL-I to newer positions.

  3. Typing  %  while the cursor is on a (,),[,],{, or } goes to its match.

  4. To substitute new for the first old in a line type    :s/old/new
     To substitute new for all 'old's on a line type       :s/old/new/g
     To substitute phrases between two line #'s type       :#,#s/old/new/g
     To substitute all occurrences in the file type    :%s/old/new/g
     To ask for confirmation each time add 'c'         :%s/old/new/gc
Lesson 5 SUMMARY
  1.  :!command  executes an external command.

      Some useful examples are:
     (MS-DOS)     (Unix)
      :!dir        :!ls        -  shows a directory listing.
      :!del FILENAME   :!rm FILENAME   -  removes file FILENAME.

  2.  :w FILENAME  writes the current Vim file to disk with name FILENAME.

  3.  v  motion  :w FILENAME  saves the Visually selected lines in file
      FILENAME.

  4.  :r FILENAME  retrieves disk file FILENAME and puts it below the
      cursor position.

  5.  :r !dir  reads the output of the dir command and puts it below the
      cursor position.
Lesson 6 SUMMARY
  1. Type  o  to open a line BELOW the cursor and start Insert mode.
     Type  O  to open a line ABOVE the cursor.

  2. Type  a  to insert text AFTER the cursor.
     Type  A  to insert text after the end of the line.

  3. The  e  command moves to the end of a word.

  4. The  y  operator yanks (copies) text,  p  puts (pastes) it.

  5. Typing a capital  R  enters Replace mode until  <ESC>  is pressed.

  6. Typing ":set xxx" sets the option "xxx".  Some options are:
    'ic' 'ignorecase'   ignore upper/lower case when searching
    'is' 'incsearch'    show partial matches for a search phrase
    'hls' 'hlsearch'    highlight all matching phrases
     You can either use the long or the short option name.

  7. Prepend "no" to switch an option off:   :set noic
Lesson 7 SUMMARY
  1. Type  :help  or press <F1> or <Help>  to open a help window.

  2. Type  :help cmd  to find help on  cmd .

  3. Type  CTRL-W CTRL-W  to jump to another window

  4. Type  :q  to close the help window

  5. Create a vimrc startup script to keep your preferred settings.

  6. When typing a  :  command, press CTRL-D to see possible completions.
     Press <TAB> to use one completion.
vimtutor summary
  This concludes the Vim Tutor.  It was intended to give a brief overview of
  the Vim editor, just enough to allow you to use the editor fairly easily.
  It is far from complete as Vim has many many more commands.  Read the user
  manual next: ":help user-manual".

  For further reading and studying, this book is recommended:
    Vim - Vi Improved - by Steve Oualline
    Publisher: New Riders
  The first book completely dedicated to Vim.  Especially useful for beginners.
  There are many examples and pictures.
  See http://iccf-holland.org/click5.html

  This book is older and more about Vi than Vim, but also recommended:
    Learning the Vi Editor - by Linda Lamb
    Publisher: O'Reilly & Associates Inc.
  It is a good book to get to know almost anything you want to do with Vi.
  The sixth edition also includes information on Vim.

  This tutorial was written by Michael C. Pierce and Robert K. Ware,
  Colorado School of Mines using ideas supplied by Charles Smith,
  Colorado State University.  E-mail: bware@mines.colorado.edu.

  Modified for Vim by Bram Moolenaar.
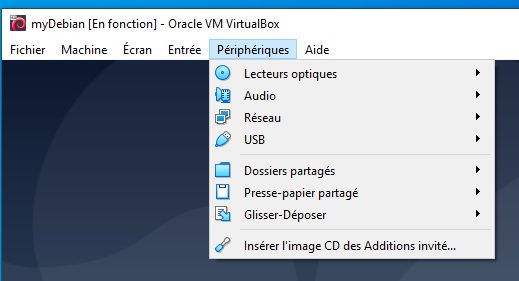
VirtualBox - Installer les Additions invité sur une image debian
Disque des additions
Après que la machine soit lancée, insérer l'image CD des Additions invité.
Dépendances nécessaires
sudo apt-get install build-essential module-assistant gcc make perl dkms
sudo m-a prepare
Installation des additions
sudo mount /media/cdrom
sudo sh /media/cdrom/VBoxLinuxAdditions.run
sudo reboot
Sway Cheatsheet
https://i3wm.org/docs/userguide.html
https://github.com/swaywm/sway/wiki
Throughout this guide, the Sway logo will be used to refer to the configured modifier. This is the Super/ (Mod4) by default, with key (Mod1) being a popular alternative.
Basics
| open new terminal | |
| focus left | |
| focus down | |
| focus up | |
| focus right | |
| focus parent | |
| toggle focus mode |
Moving windows
| move window left | |
| move window down | |
| move window up | |
| move window right |
Modifying windows
| toggle fullscreen | |
| split a window vertically | |
| split a window horizontally | |
| resize mode |
Look at the “Resizing containers / windows” section of the user guide.
Changing the container layout
| default (toggle vertical/horizontal) | |
| stacking | |
| tabbed |
Floating
| toggle floating | |
| drag floating |
Using workspaces
| switch to another workspace | |
| move a window to another workspace |
Opening applications / Closing windows
| open application launcher (dmenu) | |
| kill a window |
Restart / Exit
| reload the configuration file | |
| exit Sway |
Copyright © 2012, Michael Stapelberg
All rights reserved
Designed by Zeus Panchenko, updated by Moritz Bandemer and Davide Depau
Permission is granted to copy, distribute and/or modify this document provided the copyright notice and this permission notice are preserved on all copies.
Connexion automatique d'un utilisateur sous Debian
Connexion automatique
Un programme permet de les terminaux : getty. L'idée est donc de lui demander de connecter automatiquement un utilisateur lorsqu'il est en tty1, autrement dit depuis le terminal 1 du PC.
La démarche est expliquée dans la documentation de Arch : getty - ArchWiki.
Il convient d'abord de créer un fichier de configuration alternative afin de pas perdre ses réglages lors d'une mise à jour du système :
sudo systemctl edit getty@tty1.service
Cela va créer un fichier override.conf reprenant tous la configuration d'origine en commentaire. On décommente et modifie le fichier afin d'avoir les lignes suivantes :
[Service]
# # the VT is cleared by TTYVTDisallocate
# # The '-o' option value tells agetty to replace 'login' arguments with an
# # option to preserve environment (-p), followed by '--' for safety, and then
# # the entered username.
ExecStart=
ExecStart=-/sbin/agetty --noclear --autologin <username> %I $TERM
-
[Service]permet d'indiquer l'emplacement des modifications à apporter. - Le premier
[ExecStart]permet de remettre à zéro le précédent réglage. - La dernière ligne permet de connecter l'utilisateur
<username>sans entrer de mot de passe.
Pour ma part, l'édition s'est faite dans Nano, au moment de l'enregistrement, j'ai du changer le nom du fichier : /etc/systemd/system/getty@tty1.service.d/override.conf.
Si on laisse les options -o '-p -f -- \\u', le nom d'utilisateur sera pré-rempli, mais il faudra toujours entrer le mot de passe.
Lancement automatique d'une commande
Cela se joue dans le fichier .zshrc de l'utilisateur.
Étant donné que je fais appel à une fonction dans mon script (c'est un peu imbriqué dans tous les sens mon affaire…), je le place à la toute fin de mon fichier.
[[ `tty` == /dev/tty1 ]] && <command>
La commande ne respecte pas le standard POSIX, mais ça va bien pour zsh. Autrement, j'aurais pu mettre la commande suivante, sans quoi zsh interprète == :
[ `tty` "==" /dev/tty1 ] && <command>