GNU/Linux
- ArchLinux
- Distributions
- Supprimer un paquet récalcitrant dans Debian
- Installation des Lenovo sous LinuxMint avec compte Public
- Divers
- Affichage date et heure sur le terminal
- Gérer en série des postes sous Debian-like depuis un poste sous Unix-like
- Installation de l'imprimante SHARP MX-2314N sur Linux
- Installer docker et docker-compose sur RHEL-like
- Mise à jour de NodeJS sous Centos8
- Mise à jour de Scoold sur Heroku
- Remplacer les points dans les noms de fichiers par des espaces
- Script de mise à jour sous Debian-like
- Tmux tips
- Vim Tips 🇬🇧
- Vimtutor Summaries
- VirtualBox - Installer les Additions invité sur une image debian
- Sway Cheatsheet
- Connexion automatique d'un utilisateur sous Debian
- Docker
- Environnement de bureau
- Gnome - Raccourcis sur le bureau
- Permettre le défilement naturel du touchpad dans XFCE (défilement inversé)
- Personnalisation de KDE Plasma
- Gérer les dotfiles
- Serveur / Server
- Certificat TLS/SSL avec Cockpit
- Configurer DNSSEC sur un serveur CentOS8 faisant authorité avec Bind 🇫🇷
- Configurer IPv6 sur un VPS OVH sous Red Hat Family
- Configurer un serveur DNS avec BIND sous CentOS 8 🇫🇷
- Create swape file 🇬🇧
- Insérer sa vérification Mastodon dans BookStack 🇫🇷
- Installation de Certbot 🇫🇷
- Recevoir un e-mail lors d'une connection SSH
- Script de sauvegarde avec Borg
ArchLinux
Installation de ArchLinux dans VirtualBox
Version de ArchLinux téléchargée : 2021.07.01-x86_64.
Version de VirtualBox : 6.1.
Configuration de la machine virtuelle
- 4Go mininum de mémoire vive.
- Disquette désactivée.
- 2 processeurs.
- 128Mo de mémoire vidéo.
- Accélération 3D désactivée.
- Mode d'accès réseau par pont (en0: Wi-Fi).
- Mode UEFI non activé.
Monter l'image ISO de ArchLinux sur le lecteur optique IDE de VirtualBox.
Lancement de l'installation
Initialisation de l'installation
- Clavier en français (Set the keyboard layout).
- Teste de la connexion (Connect to the internet).
- Permettre la synchronisation de l'horloge (Update the system clock).
- Définir le fuseau horaire.
loadkeys fr
ping -c 4 archlinux.org
# [...] 4 pings et le résumé
timedatectl set-ntp true
timedatectl set-timezone Europe/Paris
Gestion du disque
Vérifier les disques
lsblk
Résultat :
NAME   MAJ:MIN  RM    SIZE  RO  TYPE  MOUNTPOINTS
loop0    7:0     0  641.6M   1  loop  /run/archiso/airootfs
sda      8:0     0     40G   0  disk
sr0     11:0     1  779.3M   0  rom   /run/archiso/bootmnt
Partitionner
fdisk /dev/sda
Résultat :
Command (m for help): n
Partition type
	p	primary (O primary, O extended, 4 free)
	e	extended (container for logical partitions)
Select (default p):
Partition number (1-4, default 1):
First sector (2048-83886079, default 2048):
Last sector, +/-sectors or +/-size{K,M,G,T,P} (2048-83886079, default 83886079): +4G

Created a new partition 1 of type 'Linux' […]

Command (m for help): t
Selected partion 1
Hex code or alias (type L to list all): 82
Changed type of partition 'Linux' to 'Linux swap / Solaris'.

Command (m for help): n
	[…]
Select (default p):
Partition number (2-4, default 2):
First sector […]:
Last sector, […]:

# pour afficher le résultat final
Command (m for help): p

Command (m for help): w
The partition table has been altered.
Calling ioctl() to re-read partition table.
Syncing disks.
Vérifier la nouvelle table de partition
lsblk
Résultat :
NAME   MAJ:MIN  RM    SIZE  RO  TYPE  MOUNTPOINTS
loop0    7:0     0  641.6M   1  loop  /run/archiso/airootfs
sda      8:0     0     40G   0  disk
|—sda1   8:1     0      4G   0  part
|—sda2   8:2     0     36G   0  part
sr0     11:0     1  779.3M   0  rom   /run/archiso/bootmnt
Formater les partitions
Formater la partition swap.
mkswap /dev/sda1
Formter la partition home.
mkfs.ext4 /dev/sda2
Monter les partitions
swapon /dev/sda1
mount /dev/sda2 /mnt
Installation du système
pacstrap /mnt base base-devel linux linux-firware sudo networkmanager vim zsh git man-db man-pages texinfo
Prendre un café…
Paramétrage du système
Générer la table de partition
genfstab -U /mnt > /mnt/etc/fstab
Entrer dans le chroot
arch-chroot /mnt
Paramétrer le fuseau horaire et synchroniser l'horloge
ln -sf /usr/share/zoneinfo/Europe/Paris /etc/localtime
hwclock --systohc
Fichier locale.gen
Génération des données locales
Décommenter les lignes en_US.UTF-8 UTF-8 (et fr_FR.UTF-8 UTF-8 si nécessaire) dans le fichier /etc/locale.gen.
Puis générer les données locales.
locale-gen
Résultat :
Generating locale...
	en_US.UTF-8... done
	fr_FR.UTF-8... done
Generation comple.
Régler les données locales par défaut
echo "LANG=en_US.UTF-8
LC_COLLATE=C" > /etc/locale.conf
Régler le clavier en français
echo "KEYMAP=fr-latin9" > /etc/vconsole.conf
Entrer le hostname
echo "myarch" > /etc/hostname
Régler le fichier hosts
echo "127.0.0.1 localhost
::1 localhost
127.0.1.1 myarch.local myarch" >> /etc/hosts
Régler le mot de passe de root
passwd
Définir l'éditeur par défaut
Mais aussi ajouter quelques aliases.
echo "alias l='ls -lah'
alias vi='vim'
export EDITOR='vim'" >> /etc/skel/.bashrc
Bootloader : grub
Arch boot process - Boot loader.
GRUB - MBR.
pacman -S grub
# […]
grub-install --target=i386-pc /dev/sda
(Re-)Générer le fichier de configuration principale.
GRUB - Generate the main configuration file.
grub-mkconfig -o /boot/grub/grub.cfg
Microcode(s)
Dans l'hypothèse d'une machine virtuelle déplaçable, installer les 2 microcodes.
Microcode.
pacman -S intel-ucode amd-ucode
Regénérer le fichier de configuration de Grub.
grub-mkconfig -o /boot/grub/grub.cfg
NetworkManager
systemctl enable NetworkManager
Redémarrer
exit
umount -R /mnt
reboot
Penser à éjecter l'image ISO d'installation…
Gestion des utilisateurs
Groupe wheel
Nécessite que sudo soit bien installé et que le VISUAL soit bien défini (par exemple vim).
Sudo.
visudo
Puis décommenter la ligne :
## Uncomment to allow members of group wheel to execute any command
%wheel ALL=(ALL) ALL
Ajout d'un utilisateur
useradd -m -g wheel -c '<username>' -s /usr/bin/zsh username
passwd <username>
exit
Personnalisation de zsh
La personnalisation se fait depuis le compte utilisateur.
Installer oh-my-zsh
sh -c "$(curl -fsSL https://raw.github.com/ohmyzsh/ohmyzsh/master/tools/install.sh)"
Personnaliser le thème voulu dans le fichier ~/.zshrc.
Installer le plugin zsh-autosuggestions
git clone https://github.com/zsh-users/zsh-autosuggestions ${ZSH_CUSTOM:-~/.oh-my-zsh/custom}/plugins/zsh-autosuggestions
Activer le plugin dans le fichier ~/.zshrc.
plugins=([…] zsh-autosuggestions […])
Installer le plugin zsh-syntax-highlighting.
git clone https://github.com/zsh-users/zsh-syntax-highlighting.git ${ZSH_CUSTOM:-~/.oh-my-zsh/custom}/plugins/zsh-syntax-highlighting
Le plugin doit être le dernier activé dans le fichier ~/.zshrc.
plugins=( [plugins...] zsh-syntax-highlighting)
Vraiment personnaliser zsh
yay -S ttf-meslo-nerd-font-powerlevel10k zsh-theme-powerlevel10k-git
[…]
echo "source /usr/share/zsh-theme-powerlevel10k/powerlevel10k.zsh-theme" >> ~/.zshrc
Relancer zsh et répondre au question pour peronnaliser ZSH Powerline 10k.
Si besoin, pour relancer la configuration de zsh-theme-powerlevel10k :
p10k configure
Serveur d'affichage Xorg
Vérifier le pilote vidéo nécessaire à la ligne Subsystem.
lspci -v | grep -A1 -e VGA -e 3D
Résultat :
00:02.0 VGA compatible controller: VMware SVGA II Adapter (prog-if 00 [VGA controller])
	Subsystem: VMware SVGA II Adapter
	Flags: bus master, fast devsel, latency 64, IRQ 18
pacman -S xorg-server xf86-video-vmware
Environnement de bureau : Plasma & KDE
-
plasma→ environnement de bureau. -
kde-applications→ ensemble d'applications. - Des polices…
-
packagekit-qt5→ permet àDiscoverde fonctionner correctement (Discover does not show any applications).
pacman -S plasma kde-applications ttf-{bitstream-vera,liberation,freefont,dejavu} freetype2 packagekit-qt5
Reprendre un deux trois cafés…
Gestionnaire d'affichage : SDDM
pacman -S sddm
systemctl enable sddm
localectl set-x11-keymap fr-latin9
systemctl start sddm
Il est possible de personnaliser le thème.
mkdir /etc/sddm.conf.d/
cat << EOF > /etc/sddm.conf.d/theme.conf
[Theme]
Current=breeze
EOF
Gestionnaire de paquets AUR
L'installation du gestionnaire de paquet soit se faire depuis un compte utilisateur (autre que root), sans quoi il n'est pas possible de lancer le makepkg.
AUR helpers.
git clone https://aur.archlinux.org/yay.git
cd yay
makepkg -si
yay -S yay
Si il y a une erreur, réinstaller base-devel.
Installer le Guest Additions
pacman -S virtualbox-guest-utils
systemctl enable vboxservice
systemctl start vboxservice
Recommandations générales
Installer ArchLinux - UEFI
Version de ArchLinux téléchargée : 2021.07.01-x86_64
Type de connection : Ethernet
Mode de démarrage : UEFI
Lancer de l'installation
Initialiser l'installation
Mettre le clavier en français
La première commande permet de lister les claviers français.
ls /usr/share/kbd/keymaps/**/*fr*.map.gz
loadkeys fr
Tester la connexion
ping -c 4 archlinux.org
# [...] 4 pings et le résumé
Régler le fuseau horaire
timedatectl set-ntp true
timedatectl set-timezone Europe/Paris
Vérifier le système de démarrage
ls /sys/firmware/efi/efivars
Si la commande révèle bien le dossier sans erreur, le système de démarrage est bien en UEFI.
Gérer les disques
Vérifier les disques
lsblk
NAME   MAJ:MIN  RM    SIZE  RO  TYPE  MOUNTPOINTS
loop0    7:0     0  620.8M   1  loop  /run/archiso/airootfs
sda      8:0     0  465.8G   0  disk
[…]
sdb      8:16    1  998.3M   0  disk  /run/archiso/bootmnt
[…]
sr0     11:0     1  779.3M   0  rom   /run/archiso/bootmnt
Sauvegarder la table de partition
Backup and restore partition table.
sfdisk -d /dev/sda > sda.dump
Partitionner
fdisk /dev/sda
Noter la mention :
Changes will remain in memory onlu, until you decide to write them.
Be careful bfore using the write command.


Command (m for help): m

Help:

	GPT
     M	enter protective/hybrid MBR

    Generic
     d	delete a partition
     F	list free un partitioned space
     l	list known partition types
     n	add a new partition
     p	print the partition table
     t	change a partition type
     v	verify the partition table
     i	print information about a partition

    Misc
     m	print this menu
     x	extra functionality (experts only)

    Script
     I	load disk layout from sfdisk script file
     O	dum disk layout to sfdisk script file

    Save & Exit
     w	write table to disk and exit
     q	quit without saving changes

    Create a new lable
     g	create a new empty GPT parition table
     G	create a new empty SGI (IRIX) parition table
     o	create a new empty DOS partition table
     s	create a new empty Sun partition table
Créer la table de partition et les partitions
Create a partition table and partitions.
Créer une table GPT vide
Command (m for help): g
Créer les partitions
Schéma de partitions :
| Point de montage | Partition | Type de partition | Taille suggérée |
|---|---|---|---|
| /mnt/boot or /mnt/efi | /dev/sda1 | EFI system partition | Au moins 260 MiB |
| SWAP | /dev/sda2 | Linux swap | Plus de 512 MiB |
| /mnt | /dev/sda3 | Linux x86-64 root (/) | Reste du disque |
Command (m for help): n
Partition number (1-128, default 1):
First sector ([…]):
Last sector, +/-sectors or +/-size{K,M,G,T,P} ([…]): +360M

[…]

Command (m for help): n
Partition number (1-128, default 2):
First sector ([…]):
Last sector, +/-sectors or +/-size{K,M,G,T,P} ([…]): +4G

[…]

Command (m for help): n
Partition number (1-128, default 3):
First sector ([…]):
Last sector, +/-sectors or +/-size{K,M,G,T,P} ([…]):

[…]

Command (m for help): t
Partition number (1-128, default 3): 1
Partition type or alias (type L to list all): uefi

[…]

Command (m for help): t
Partition number (1-128, default 3): 2
Partition type or alias (type L to list all): swap

[…]

Command (m for help): t
Partition number (1-128, default 3):
Partition type or alias (type L to list all): 23

[…]

Command (m for help): w
Formater les partitions
Formater la partition EFI.
mkfs.fat -F32 /dev/sda1
Formater la partition swap.
mkswap /dev/sda2
[…]
Formter la partition home.
mkfs.ext4 /dev/sda3
[…]
Monter les partitions
Monter la partition home.
mount /dev/sda3 /mnt
Monter la partition EFI.
mkdir /mnt/efi
mount /dev/sda1 /mnt/efi
Monter la partition swap.
swapon /dev/sda2
Paramétrage du système
Générer la table de partition
genfstab -U /mnt >> /mnt/etc/fstab
Entrer dans le chroot
arch-chroot /mnt
Paramétrer le fuseau horaire et synchroniser l'horloge
ln -sf /usr/share/zoneinfo/Europe/Paris /etc/localtime
hwclock --systohc
Localisation
Génération des données locales
Décommenter les lignes fr_FR.UTF-8 UTF-8 (et en_US.UTF-8 UTF-8 si nécessaire) dans le fichier /etc/locale.gen.
Puis générer les données locales.
locale-gen
Régler les données locales par défaut
echo "LANG=fr_FR.UTF-8
LC_COLLATE=C" > /etc/locale.conf
Régler le clavier en français
echo "KEYMAP=fr-latin9" > /etc/vconsole.conf
Entrer le hostname
echo "<hostname voulu>" > /etc/hostname
Régler le fichier hosts
echo "127.0.0.1 localhost
::1 localhost
127.0.1.1 <hostname voulu>.local <hostname voulu>" >> /etc/hosts
Régler le mot de passe de root
passwd
Définir l'éditeur par défaut
Mais aussi ajouter quelques alias…
echo "alias l='ls -lah'
alias vi='vim'
export EDITOR='vim'" >> /etc/skel/.bashrc
Bootloader : GRUB
Arch boot process - Boot loader. GRUB - GPT.
pacman -S --noconfirm grub efibootmgr
grub-install --target=x86_64-efi --efi-directory=/efi --bootloader-id=GRUB
Générer le fichier de configuration principale.
Generate the main configuration file.
grub-mkconfig -o /boot/grub/grub.cfg
Microcode
pacman -S intel-ucode
grub-mkconfig -o /boot/grub/grub.cfg
NetworkManager
Redémarrer
exit
umount -R /mnt
reboot
Liens pouvant servir
Update error keyring
sudo pacman -Syy
sudo pacman-key --refresh-keys
sudo pacman-key --populate archlinux manjaro
sudo pacman -Sc
Or:
sudo rm -r /etc/pacman.d/gnupg
sudo pacman-key --init
sudo pacman-key --populate archlinux
sudo pacman-key --refresh-keys
sudo pacman -Sy gnupg archlinux-keyring
sudo pacman -Sc
Or (e.g. for EndeavourOS):
sudo pacman -Syy archlinux-keyring endeavouros-keyring
sudo pacman -Su
Source:
- https://forum.manjaro.org/t/manjaro-is-unable-to-update-gpgme-keyring-errors/96941
- Signature is unknown trust - Arch Linux on VBox - DEV Community 👩💻👨💻
Distributions
Supprimer un paquet récalcitrant dans Debian
Contexte
Je voulais faire la mise à jour :
sudo sh -c "apt update && apt upgrade"
[…]
apt-listchanges: Reading changelogs...
dpkg: unrecoverable fatal error, aborting:
 files list file for package 'tree' is missing final newline
E: Sub-process /usr/bin/dpkg returned an error code (2)
Il semblerait que le paquet tree cafouille. Je tente de le désintaller, réinstaller, purger : toujours la même erreur.
Solution
Source : Manually remove a broken package in Ubuntu/Debian.
sudo mv /var/lib/dpkg/info/tree.* /tmp
sudo dpkg --remove --force-remove-reinstreq tree
dpkg: warning: files list file for package 'tree' missing; assuming package has no files currently installed
(Reading database ... 53872 files and directories currently installed.)
Removing tree (1.8.0-1) ...
Installation des Lenovo sous LinuxMint avec compte Public

Renommage de la session principale
Réalisé par Loïs
Passage en mode root, donc sans interface graphique avec ctrl+alt+F1.
Changement du nom d'utilisateur, du répertoire et du commentaire
usermod -l <new_name> <old_name>
usermod -c "<eal_name>" <new_name>
mv /home/<old_name> /home/<new_name>
usermod -d /home/<new_name> -m <new_name>
Édition avec les commandes prévues pour…
Idéalement, on installe l'éditeur de son choix. Par exemple : vim…
Éditer le fichier passwd :
sudo vipw
Éditer le fichier group :
sudo vigr
Éditer le fichier shadow :
sudo vigr -s
Éditer le fichier gshadow :
sudo vipw -s
Installation et réglages d'applications
Paquets
- Vim
- Ansible
- openssh-server
- sshpass
- pandoc
- texlive-latex-recommended
Réglages
Firefox
Installation d'extensions :
- CanvasBlocker
- ClearURLs
- Privacy Badger
- uBlock Origin
Réglage des règles de confidentialités, changement du moteur de recherche par défaut (DuckDuckGo), désactivation de pocket (dans about:config).
Compte public
Duplicata de ces réglages, puis réglage pour ne pas garder d'historique de navigation. Lancement du gestionnaire de profile de Firefox :
firefox -P
SSH Server
sudo systemctl enable ssh
sudo systemctl start ssh
Nom du poste
sudo hostnamectl set-hostname <new_hostname>
On peut vérifier avec la commande :
hostname
Compte public
Création du compte public
sudo useradd -d /tmp/home/public -m -s /bin/bash -c "Public" public
S'en suit un message :
useradd: warning: chown on `/tmp/home/public' failed: Aucun fichier ou dossier de ce type
Mais tout va bien :
$ ll /tmp/home/
total 12
drwxr-xr-x  3 root   root   4096 déc.   7 18:16 ./
drwxrwxrwt 20 root   root   4096 déc.   7 18:16 ../
drwxr-x---  3 public public 4096 déc.   7 18:16 public/
Script rc.local
Ce script se lance au démarrage de l'ordinateur.
#!/bin/sh -e
#
# rc.local

PUBLIC_DIRECTORY="/tmp/home/public"
FIREFOX_PROFILE="b1pbqxyv.Utilisateur_Public"
FIREFOX_OTHER="kvzrh4tu.default-release"

mkdir -p "$PUBLIC_DIRECTORY"/.mozilla
chmod -R 700 "$PUBLIC_DIRECTORY"/.mozilla
rsync -av /etc/skel/ "$PUBLIC_DIRECTORY"

cp -ar /home/admin/.mozilla/firefox "$PUBLIC_DIRECTORY"/.mozilla/
sed -i "s/Default=$FIREFOX_OTHER/Default=$FIREFOX_PROFILE/g" "$PUBLIC_DIRECTORY"/.mozilla/firefox/installs.ini
sed -i "s/Default=$FIREFOX_OTHER/Default=$FIREFOX_PROFILE/g" "$PUBLIC_DIRECTORY"/.mozilla/firefox/profiles.ini

chown -R public:public "$PUBLIC_DIRECTORY"

exit 0
Le principe est d'initialiser les réglages de la session public avec les réglages par défaut contenu dans le dossier /etc/skel/.
Ensuite, les fichiers contenus dans le dossier /home/admin/.mozilla/firefox sont copiés dans le dossier utilisateur afin de
récupérer les fichiers de configuration. Puis le profile par défaut est changé dans les fichiers installs.ini et profiles.ini.
Automatisation avec Ansible
Ansible (is Simple IT Automation) est une application développée par Red Hat :
Ansible® est un outil Open Source d'automatisation informatique qui automatise le provisionnement, la gestion des configurations, le déploiement des applications, l'orchestration et bien d'autres processus informatiques manuels. À la différence des outils de gestion plus simples, avec Ansible les utilisateurs (administrateurs système, développeurs, architectes) peuvent recourir aux fonctions d'automatisation pour installer des logiciels, automatiser des tâches quotidiennes, provisionner une infrastructure, améliorer le niveau de sécurité et de conformité, appliquer des correctifs système et partager leurs processus automatisés avec toute l'entreprise.
Le principe sera d'automatiser l'installation, la configuration et l'uniformisation de l'installation sur tous les postes. Ansible nécessite une installation sur le poste donneur d'ordre et simplement de Python sur les ordinateurs cibles, dits hosts.
Fichier /etc/hosts
Fichier /etc/ansible/hosts
Gestion des secrets
Playbooks
Divers
Affichage date et heure sur le terminal
Commande showdt
Il d'abord disposer des binaires watch et figlet (à installer).
Par défaut, les polices de figlet sont dans le répertoire /usr/share/figlet/.
On peut y installer la police doh (https://www.figlet.org/fonts/doh.flf)
Puis on peut assigner l'alias :
alias showdt="watch -tn 1 date '+%A\ %d\ %B%n%H\ \ \:\ \ %M\ \:\ \ %S' \| figlet -ct -f doh"
Toutes les secondes la date est raffraîchie et s'affiche au centre du terminal en utilisant toute la largeur disponible.
Lancer dans un tmux
Il faut évidemment que tmux soit installer.
#!/bin/bash

session="big_clock"
window="$session":0

# Create new session but not attached
tmux new-session -d -s "$session"
# Launch showdt alias in the window
tmux send-keys -t "$window" 'showdt' C-m
# Attach the session
tmux -2 attach-session -t "$session"
Mettre à jour l'affichage
Il arrive que l'affichage cafouille (notamment quand le PC est très sollicité), avec un cronjob on peut actualiser l'affichage.
#!/bin/bash

session="big_clock"

# Check if session exists
exist_bg=$(tmux has-session -t "$session" 2>/dev/null)

if [[ "$exist_bg" != 0 ]]; then
  client=$(tmux list-client | sed 's/:/ /g' | awk '/tty/ {print $1}' | awk 'NR==1')
        # Refresh screen
        tmux refresh -t "$client"
        if [[ "$?" != 0 ]]; then
                # Log in /var/log/messages
                logger "Session "$session" NOT reloaded"
                exit 1
        else
#               logger "Session "$session" reloaded"
                exit 0
        fi
else

        exit 1
fi
Gérer en série des postes sous Debian-like depuis un poste sous Unix-like
Installation de Linux Mint
- Télécharger l'ISO de Linux Mint sur le site officiel.
- Copier l'ISO sur une clés USB, un DVD ou une clés Ventoy.
- Procéder à l'installation sur le poste (il faut probablement changer l'amorçage).
Une fois que l'installation est terminé, récupérer l'adresse IP locale (idéalement fixer l'adresse IP depuis le router) :
ip address
1: lo: <LOOPBACK,UP,LOWER_UP> mtu 65536 qdisc noqueue state UNKNOWN group default qlen 1000
    link/loopback 00:00:00:00:00:00 brd 00:00:00:00:00:00
    inet 127.0.0.1/8 scope host lo
       valid_lft forever preferred_lft forever
    inet6 ::1/128 scope host
       valid_lft forever preferred_lft forever
2: enp7s0: <NO-CARRIER,BROADCAST,MULTICAST,UP> mtu 1500 qdisc fq_codel state DOWN group default qlen 1000
    link/ether 40:61:86:1d:40:c6 brd ff:ff:ff:ff:ff:ff
3: wlp6s0: <BROADCAST,MULTICAST,UP,LOWER_UP> mtu 1500 qdisc noqueue state UP group default qlen 1000
    link/ether 1c:4b:d6:75:6d:52 brd ff:ff:ff:ff:ff:ff
    inet 192.168.188.46/24 brd 192.168.188.255 scope global dynamic noprefixroute wlp6s0
       valid_lft 863809sec preferred_lft 863809sec
    inet6 fe80::2803:cab0:e242:aaf5/64 scope link noprefixroute
       valid_lft forever preferred_lft forever
Ici, on note depuis l'interface wlp6s0 que l'adresse IP locale est 192.168.188.46.
Normalement le serveur SSH est installé et activé par défaut, on vérifie :
sudo systemctl status ssh
● ssh.service - OpenBSD Secure Shell server
     Loaded: loaded (/lib/systemd/system/ssh.service; enabled; vendor preset: e>
     Active: active (running) since Mon 2021-09-20 11:32:56 CEST; 7min ago
[…]
Si le processus n'est pas actif, ou si l'on obtient une erreur :
sudo apt install openssh-server -y
sudo systemctl enable ssh
sudo systemctl start ssh
On répète l'opération pour chaque PCs.
Préparations
Fichier DNS
Modifier le fichier /etc/hosts pour y entrer les adresses IP des PCs, exemple :
127.0.0.1   localhost localhost.localdomain localhost4 localhost4.localdomain4
::1         localhost localhost.localdomain localhost6 localhost6.localdomain6

192.168.188.30	mintepn01
192.168.188.45  mintepn06
192.168.188.46  mintepn08
On peut tester la communication avec :
ping -c 4 mintepn08
PING mintepn08 (192.168.188.46) 56(84) octets de données.
64 octets de mintepn08 (192.168.188.46) : icmp_seq=1 ttl=64 temps=2.04 ms
64 octets de mintepn08 (192.168.188.46) : icmp_seq=2 ttl=64 temps=1.82 ms
64 octets de mintepn08 (192.168.188.46) : icmp_seq=3 ttl=64 temps=1.91 ms
64 octets de mintepn08 (192.168.188.46) : icmp_seq=4 ttl=64 temps=3.30 ms

--- statistiques ping mintepn08 ---
4 paquets transmis, 4 reçus, 0% packet loss, time 3129ms
rtt min/avg/max/mdev = 1.822/2.268/3.303/0.602 ms
Si on n'a pas de communication, on vérifie avant de continuer !
Clés SSH
On se connecte un première fois de façon classique en SSH :
ssh epnadm@epn08
Normalement il ajoute le PC dans le fichier ~/.ssh/know_host.
Ensuite on transmet sa clés SSH publique :
ssh-keygen -t rsa # Pour créer la paire de clés SI ce n'est déjà fait
ssh-copy-id epnadm@epn08 # Transfert de clés publique, à faire à chaque PC
Fichier permettant la remise à zéro des données
Créer un fichier rc.local :
#!/bin/sh -e
#
# rc.local
mkdir /tmp/invite
rsync -av /etc/skel/ /tmp/invite
chown invite -R /tmp/invite
[[ -d "/home/invite" ]] || ln -s /tmp/invite /home

exit 0
Ansible sur le PC maître
Installation
Si Ansible n'est pas installé :
sudo dnf install ansible sshpass # Ici sous Fedora / sshpass dans le cas d'une installation un peu ancienne
Fichier hosts de Ansible
Éditer le fichier /etc/ansible/hosts pour y faire figurer les PCs avec les utlisateurs qui vont bien :
[workstations:vars]
ansible_user=epnadm
ansible_become_method=sudo

[workstations]
mintepn01
mintepn06
mintepn08     ansible_user=mickael	ansible_become_pass='{{ another_passwd }}'
Ici, les lignes sont commentés étant donné que le nom d'utilisteur est mis en variable globale.
On peut faire un test de communication :
ansible -m ping workstations
[WARNING]: Platform linux on host mintepn08 is using the discovered Python
interpreter at /usr/bin/python3, but future installation of another Python
interpreter could change this. See https://docs.ansible.com/ansible/2.9/referen
ce_appendices/interpreter_discovery.html for more information.
mintepn08 | SUCCESS => {
    "ansible_facts": {
        "discovered_interpreter_python": "/usr/bin/python3"
    },
    "changed": false,
    "ping": "pong"
}
mintepn06 | SUCCESS => {
    "ansible_facts": {
        "discovered_interpreter_python": "/usr/bin/python3"
    },
    "changed": false,
    "ping": "pong"
}
Fichier de secrets
Créer un fichier contenant le mot de passe de l'utilisateur ayant des droits sudo sur les PCs :
ansible-vault create secret
Pour séparer les clés des valeurs, il doit y avoir une espace ou une tabulation après : :
ansible_become_pass:	<mot de passe utilisateur>
another_passwd:			<un autre mot de passe>
Script Ansible
---
- name: Installs
  become: yes
  hosts: all
  vars:
    ansible_python_interpreter: /usr/bin/python3
  vars_files:
  - secret

  tasks:
    - name: Update & Upgrade
      apt:
        update_cache: yes
        upgrade: 'yes'
    - name: Add APT Key Ubuntu
      apt_key:
        keyserver: keyserver.ubuntu.com
        id: 83FBA1751378B444
    - name: Add LibreOffice repo
      apt_repository:
        validate_certs: no
        repo: 'deb http://ppa.launchpad.net/libreoffice/ppa/ubuntu focal main'
        state: present
      register: repolo
    - name: Update & Upgrade for LibreOffice
      apt:
        update_cache: yes
        upgrade: 'yes'
      when: repolo.changed
    - name: Automatic upgrade
      ansible.builtin.shell:
        cmd: mintupdate-automation upgrade enable
    - name: Install packages
      apt:
        pkg:
        - gimp
        - vim
        - bat
        - chromium
        - inkscape
        - gcompris
        - kmines
      state: latest
      update_cache: no
    - name: Create user 'Invité'
      ansible.builtin.user:
        name: invite
        comment: Invité
        uid: 1001
        append: yes
        groups: adm,dialout,fax,cdrom,floppy,tape,audio,dip,video,plugdev,netdev,nopasswdlogin
        create_home: no
        home: /home/invite
    - name: Remove invite's home directory
      file:
        path: /home/invite
        state: absent
    - name: Copy rc.local
      ansible.builtin.copy:
        src: ./Data/rc.local
        dest: /etc/rc.local
        owner: root
        group: root
        mode: '0711'
      register: cprclocal
    - name: Unconditionally reboot the machine with all defaults
      reboot:
      when: cprclocal.changed
Déplacer le fichier précédemment créé rc.local dans le dossier Ansible/Data.
Lancer le script Ansible :
ansible-playbook ~/Documents/Ansible/PB_install_mint.yml --ask-vault-pass
Patientre le temps du déroulement.
Tips
Pour rajouter des applications sur tous les postes, il suffit d'entrer le nom du paquet à la suite de pkg dans le script Ansible, puis de relancer le script.
En cas de dysfonctionnement dans la réintialisation du compte Invité, jeter un œil ici.
Installation de l'imprimante SHARP MX-2314N sur Linux
Aller sur le site de sharp.be pour sélectionner les pilotes d'imprimante sur Linux : lien ici.
Télécharger le driver PS/PPD.
Extraire successivement toutes les archives pour arriver au fichier Sharp-MX-2314N-ps.ppd
Modifier le fichier suivant les indications d'après le forum :
Put it right before all of the %== constraints lists and options.
*% **** Account number
*JCLOpenUI *JCLMXaccount/numero: PickOne
*OrderDependency: 80 JCLSetup *JCLMXaccount
*DefaultJCLMXaccount: A#####
*JCLMXaccount A#####/#####: "@PJL SET ACCOUNTNUMBER=<22>#####<22><0A>"
*JCLCloseUI: *JCLMXaccount
Make ##### your user number.
S'il faut une identification par username & password, se référer à ce lien.
Ajouter l'imprimante avec Configuration d'imprimante du gestionnaire d'application.
Sélectionner le fichier .pdd modifié.
Source pour gérer les imprimantes sous Manjaro ici et bonus pour gérer cups.
Source ayant inspiré la démarche : ici sur linuxfr.org.
Alternativement, il y a également une page de drivers ici.
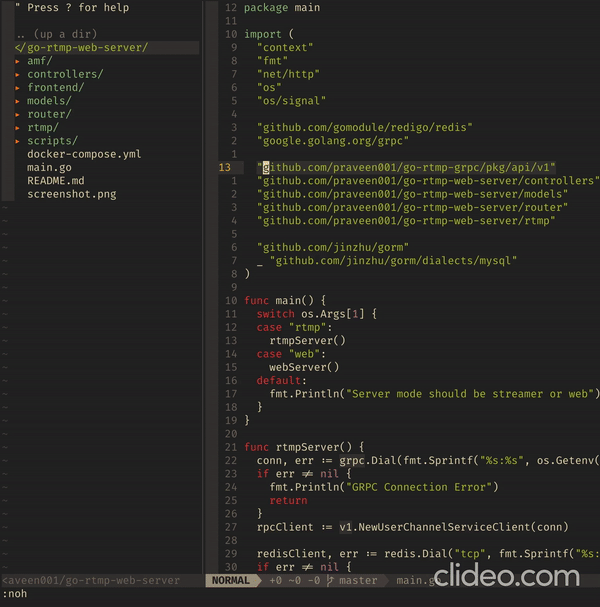
Installer docker et docker-compose sur RHEL-like
Docker
sudo dnf config-manager --add-repo=https://download.docker.com/linux/centos/docker-ce.repo
sudo dnf install docker-ce docker-ce-cli containerd.io
Régler les droits de l'utilisateur :
sudo groupadd docker # Si il n'existe pas encore
sudo usermod -aG docker $USER
Source : How to Install Docker and Docker Compose on CentOS 8 Serverspace.
Docker-compose
Télécharger le binaire dans le bon dossier
sudo curl -L "https://github.com/docker/compose/releases/download/$(curl --silent https://api.github.com/repos/docker/compose/releases/latest | grep -Po '"tag_name": "\K.*\d')/docker-compose-$(uname -s)-$(uname -m)" -o /usr/local/bin/docker-compose
Rendre le binaire exécutable
sudo chmod 755 /usr/local/bin/docker-compose
Mettre à jour
Comme pour l'installation…
Mise à jour de NodeJS sous Centos8
Vérification de la version installée et/ou disponible
On vérifie la version installer.
$ node -v
v10.24.0
On peut noter que la version installée est la 10.24, or la version lts actuelle est la 14.xx.
On vérifie les infos auprès des dépôts actuels.
$ dnf info nodejs
[…]
Paquets installés
Nom          : nodejs
Époque       : 1
Version      : 10.24.0
Publication  : 1.module_el8.3.0+717+fa496f1d
Architecture : x86_64
Taille       : 30 M
Source       : nodejs-10.24.0-1.module_el8.3.0+717+fa496f1d.src.rpm
Dépôt        : @System
Depuis le dé : appstream
Résumé       : JavaScript runtime
URL          : http://nodejs.org/
Licence      : MIT and ASL 2.0 and ISC and BSD
Description  : Node.js is a platform built on Chrome’s JavaScript runtime
             : for easily building fast, scalable network applications.
             : Node.js uses an event-driven, non-blocking I/O model that
             : makes it lightweight and efficient, perfect for data-intensive
             : real-time applications that run across distributed devices.
On constate que les dépôts présentent la même version.
Les modules
On liste les modules proposant NodeJS.
$ dnf module list nodejs
Dernière vérification de l’expiration des métadonnées effectuée il y a 0:02:18 le lun. 17 mai 2021 12:54:48 CEST.
CentOS Linux 8 - AppStream
Name          Stream           Profiles                                     Summary
nodejs        10 [d][e]        common [d], development, minimal, s2i        Javascript runtime
nodejs        12               common [d], development, minimal, s2i        Javascript runtime
nodejs        14               common [d], development, minimal, s2i        Javascript runtime

Extra Packages for Enterprise Linux Modular 8 - x86_64
Name          Stream           Profiles                                     Summary
nodejs        13               default, development, minimal                Javascript runtime

Aide : [d]éfaut, [e]activé, [x]désactivé, [i]nstallé
On peut noter que AppStream propose 3 versions différents, dont un version 14.
On opère un reset de NodeJS auprès des modules, d'après le manuel :
dnf [options] module reset <module-name>...
              Reset module state so it’s no longer enabled or disabled.
              Consequently, all installed profiles will be removed and only RPMs
              from the default stream  will  be available in the package set.
$ sudo dnf module reset nodejs
Dernière vérification de l’expiration des métadonnées effectuée il y a 2:24:41 le lun. 17 mai 2021 10:37:09 CEST.
Dépendances résolues.
====================================================================================================
 Paquet                 Architecture          Version                  Dépôt                  Taille
====================================================================================================
Réinitialisation des modules:
 nodejs

Résumé de la transaction
====================================================================================================

Voulez-vous continuer ? [o/N] : o
Terminé !
On rend opérationnel NodeJS v.14 auprès des modules.
$ sudo dnf module enable nodejs:14
Dernière vérification de l’expiration des métadonnées effectuée il y a 2:25:11 le lun. 17 mai 2021 10:37:09 CEST.
Dépendances résolues.
====================================================================================================
 Paquet                 Architecture          Version                  Dépôt                  Taille
====================================================================================================
Activation des flux de modules:
 nodejs                                       14

Résumé de la transaction
====================================================================================================

Voulez-vous continuer ? [o/N] : o
Terminé !
Finalisation
On met à jour les paquets !
$ sudo dnf upgrade
Dernière vérification de l’expiration des métadonnées effectuée il y a 2:25:27 le lun. 17 mai 2021 10:37:09 CEST.
Dépendances résolues.
====================================================================================================
 Paquet             Architecture
                             Version                                              Dépôt       Taille
====================================================================================================
Mise à jour:
 nodejs             x86_64   1:14.16.0-2.module_el8.3.0+719+59eb7cbb              appstream    11 M
 nodejs-full-i18n   x86_64   1:14.16.0-2.module_el8.3.0+719+59eb7cbb              appstream   7.5 M
 npm                x86_64   1:6.14.11-1.14.16.0.2.module_el8.3.0+719+59eb7cbb    appstream   3.7 M
Installation des dépendances faibles:
 nodejs-docs        noarch   1:14.16.0-2.module_el8.3.0+719+59eb7cbb              appstream   7.9 M

Résumé de la transaction
====================================================================================================
Installer        1 Paquet
Mettre à niveau  3 Paquets

Taille totale des téléchargements : 30 M
Voulez-vous continuer ? [o/N] : o
Téléchargement des paquets :
(1/4): nodejs-full-i18n-14.16.0-2.module_el8.3.0+719+59eb7cbb.x86_6 7.2 MB/s | 7.5 MB     00:01
(2/4): nodejs-docs-14.16.0-2.module_el8.3.0+719+59eb7cbb.noarch.rpm 7.0 MB/s | 7.9 MB     00:01
(3/4): npm-6.14.11-1.14.16.0.2.module_el8.3.0+719+59eb7cbb.x86_64.r 9.2 MB/s | 3.7 MB     00:00
(4/4): nodejs-14.16.0-2.module_el8.3.0+719+59eb7cbb.x86_64.rpm      6.7 MB/s |  11 MB     00:01
----------------------------------------------------------------------------------------------------
Total                                                                15 MB/s |  30 MB     00:01

[…]

Mis à niveau:
  nodejs-1:14.16.0-2.module_el8.3.0+719+59eb7cbb.x86_64
  nodejs-full-i18n-1:14.16.0-2.module_el8.3.0+719+59eb7cbb.x86_64
  npm-1:6.14.11-1.14.16.0.2.module_el8.3.0+719+59eb7cbb.x86_64

Installé:
  nodejs-docs-1:14.16.0-2.module_el8.3.0+719+59eb7cbb.noarch

Terminé !
On peut constater que la version est bien mise à jour.
$ node -v
v14.16.0
Source ici.
Mise à jour de Scoold sur Heroku
Github : Erudika/scoold - https://github.com/Erudika/scoold.
Déploiment Heroku : https://heroku.com/deploy?template=https://github.com/Erudika/scoold.
Se rendre dans le dossier du repo
cd ~/Documents\ autres/epn-scoold/
Tirer les modifications
git pull origin master
Pousser les modifications
git push heroku master
Remplacer les points dans les noms de fichiers par des espaces
Simplement :
find . -iname '*.<ext>' -exec rename -v 's/(?!^)\.(?!<ext>$)/ /g' {} \;
En remplaçant <ext> par l'extension fichier.
Mais encore faut-il s'en rappeler…
Script de mise à jour sous Debian-like
#!/bin/bash

txt_path=/home/"$1"/.config/system_update.txt
date_now=$(date)
declare -i date_char=$(( $(echo "$date_now" | wc -c) + 3 ))
date_stars=$(printf '*%.0s' $(seq 1 "$date_char" ))
echo "$date_stars" > "$txt_path"
echo "* $date_now *" >> "$txt_path"
echo "$date_stars" >> "$txt_path"
echo "" >> "$txt_path"
echo " Clean " >> "$txt_path"
echo " Clean "
echo "*******" >> "$txt_path"
apt-get clean >> "$txt_path"
echo "" >> "$txt_path"
echo " Autoclean " >> "$txt_path"
echo " Autoclean "
echo "***********" >> "$txt_path"
apt-get autoclean >> "$txt_path"
echo "" >> "$txt_path"
echo " Update " >> "$txt_path"
echo " Update "
echo "********" >> "$txt_path"
apt-get update >> "$txt_path"
echo "" >> "$txt_path"
echo " Upgrade " >> "$txt_path"
echo " Upgrade "
echo "*********" >> "$txt_path"
apt-get upgrade -y >> "$txt_path"
echo "" >> "$txt_path"
echo " Autoremove " >> "$txt_path"
echo " Autoremove "
echo "************" >> "$txt_path"
apt-get autoremove >> "$txt_path"
chown "$1":"$1" "$txt_path"
Tmux tips
Astuces
Lister les sessions actives
tmux ls
Renommer la session
<c-b> $
Puis on entre le nom voulu.
Attacher une session existante
tmux attach-session -t 0
Ou, pour attacher à la dernière session :
tmux attach
Où 0 est le nom de la session.
Détacher de la session
<c-b> d
Redimensionner le terminal d'après le moniteur le plus grand
<c-b>:resize-window -A
Autres paramètres utiles pour resize-window (resizew) :
-
-a: redimensionner à la taille de la plus petite session. -
-U,-D,-Let-R: ajuster le haut, le bas, à gauche ou à droite. Peut-être suivi par un nombre afin de déterminer de combien grossir (-Det-R) ou réduire (-Uet-L). -
-x <width>et/ou-y <height>pour paramétrer la largeur et la hauteur aux valeurs données.
Afficher l'aide
<c-b> ?
Pour rechercher du texte dans l'aide :
<c-s>
Sources
tmux(1) terminal multiplexer - Linux man page
List of 50+ tmux cheatsheet and shortcuts commands GoLinuxCloud.
Show_available_Options.
Read The Tao of tmux.
Tmux Scripting
Vim Tips 🇬🇧
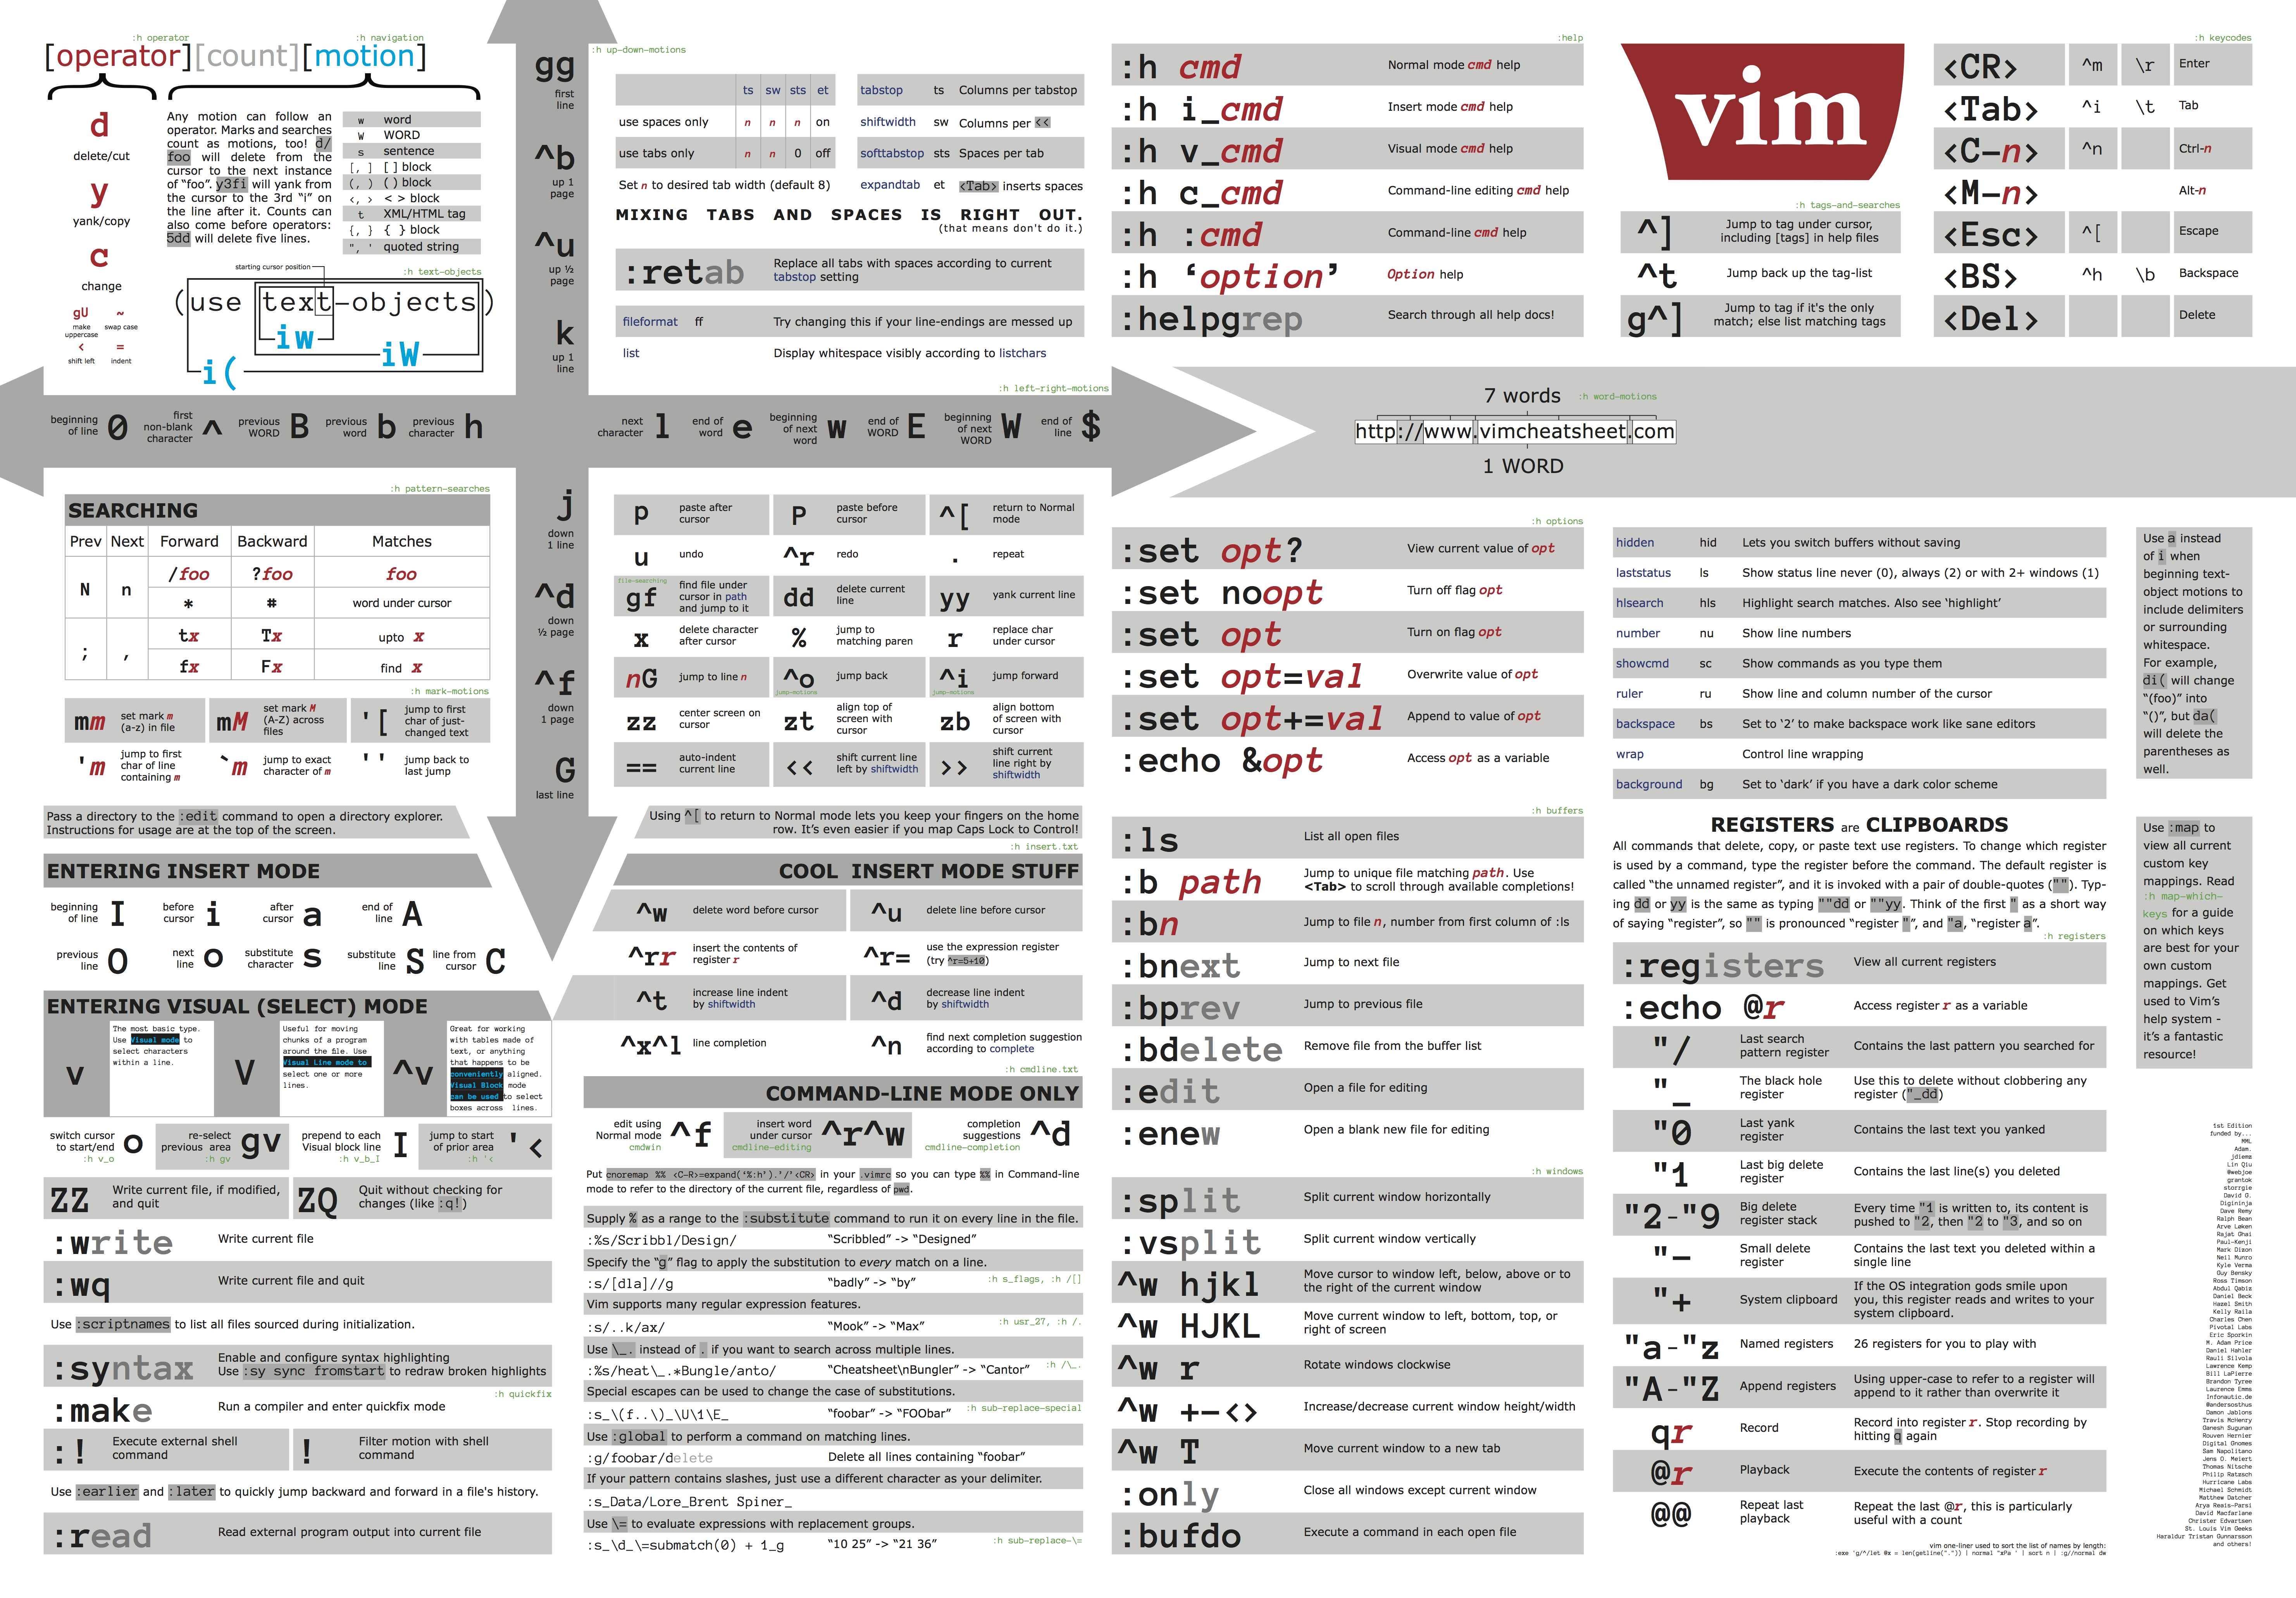
91 Vim Keyboard Shortcuts to Get Started with Vim - Tech Inscribed
Source: 91 Vim Keyboard Shortcuts to Get Started with Vim - Tech Inscribed.
This article gives you a list of most commonly used Vim keyboard shortcuts that can help you get started with Vim.
Modes
Vim has multiple modes namely Normal mode, Insert mode, Replace mode, and Visual mode.
Normal mode is where you can use most of the shortcuts. In insert mode, Vim behaves like a normal text editor. In replace mode, existing texts are replaced or overwritten as you type. Visual mode allows us to select texts visually and then make changes to it.
i |
Insert mode at the cursor. |
I |
Insert mode at the beginning of the line. |
a |
Insert mode after the cursor. |
A |
Insert mode at the end of the line. |
o |
Insert mode with a new line below. |
O |
Insert mode with a new line above. |
s |
Insert mode at the cursor, after deleting the current character. |
S |
Insert mode, after deleting the current line. |
v |
Visual mode at the cursor. |
V |
Visual mode at the beginning of the line. |
r |
Replace mode to replace the current character. |
R |
Replace mode. |
Esc |
Normal Mode or Command Mode. |
Motion or Movement
Motions are a set of shortcut keys that allow us to quickly move around the text document.
k |
Move one line up. |
j |
Move one line down. |
h |
Move one line left. |
l |
Move one line right. |
w |
Go to the beginning of the next word (separated by space/punctuation). |
W |
Go to the beginning of the next word separated by space. |
e |
Go to the end of the next word separated by punctuations/space. |
E |
Go to the end of the next word separated by space. |
b |
Go to the beginning of the previous word separated by punctuation/space. |
B |
Go to the beginning of the previous word separated by space. |
{ |
Go to the previous line break. |
} |
Go to the next line break. |
% |
Go to matching Bracket. |
# |
Go to the previous occurrence of the current word under the cursor. |
* |
Go to the next occurrence of the current word under the cursor. |
^ |
Go to the first non-empty character in the line. |
0 |
Go to the beginning of the line. |
$ |
Go to the end of the line. |
gg |
Go to the beginning of the file. |
G |
Go to the end of the file. |
gd |
Go to definition. |
:{number} |
Go to the line number. Note: This is not really a shortcut but a Vim command. |
Motion shortcuts can be prefixed with a number to repeat the motion. For example, to move 5 lines down, we can use 5j. Similarly, to move 2 words forward, we can use 2w.
Also Read: How to Set up Vim as an IDE for React and TypeScript in 2020
Searching
You can search for a character in the current line using find f and till t.
The difference between “find” and “till” is that “find” moves the cursor to the searched character, whereas “till” moves the cursor to the previous character of the searched character.
f |
Find the next occurrence of a character in the current line and go to it. |
t |
Find the next occurrence of a character in the current line and go to its previous character. |
F |
Find the previous occurrence of a character in the current line and go to it. |
T |
Find the previous occurrence of a character in the current line and go to its next character. |
To search for a phrase, you can use Vim command / or ?
/{search-word} |
Search for a word forward. For example /export will search and find the next instance of the word “export”. |
?{search-word} |
Search for a word backward. For example /export will search and find the previous instance of the word “export”. |
After searching, n and N can be used to find next and previous occurrences respectively.
n |
Find the next occurrence. To be used after using / or ? |
N |
Find the previous occurrence. To be used after using / or ? |
Deleting
Delete(d) is an operator in Vim. Operators cannot function without motion and henced is always followed by a motion. Here, the motion is what tells Vim what to delete.
That being said, you can combine all motions with d, like so.
dw |
Delete from current character to end of a word(space/punctuation/EOL). |
dW |
Delete from current character to end of a word (space/EOL). |
db |
Delete from current character to beginning of a word(space/punctuation/EOL). |
dB |
Delete from current character to beginning of a word(space/EOL). |
diw |
Delete the current word. |
diW |
Delete the current word. |
dd |
Delete the current line. |
di' |
Delete everything within the single quotes. |
di" |
Delete everything within the double-quotes. |
di( |
Delete everything within the brackets. |
di{ |
Delete everything within the curly braces. |
di[ |
Delete everything within the square brackets. |
x |
Delete the current character under the cursor. |
X |
Delete the previous character. |
You can also repeat these commands by prefixing a number. For example, you can delete 5 lines using 5dd or d4j
Changing
In Vim, changing is similar to delete, the only difference is that after deleting, insert mode gets activated.
cw |
Delete from current character to end of a word(space/punctuation/EOL) and then go to insert mode. |
cW |
Delete from current character to end of a word (space/EOL) and then go to insert mode. |
cb |
Delete from current character to beginning of a word(space/punctuation/EOL) and then go to insert mode. |
cc |
Change the current line. |
cB |
Change the current block. |
ciw |
Change inside a word. |
ciW |
Change inside a word. |
ci' |
Change everything inside a pair of single quotes. |
ci" |
Change everything inside a pair of double-quotes. |
ci( |
Change everything inside a pair of parentheses. |
ci{ |
Change everything inside a pair of curly braces. |
ci[ |
Change everything inside a pair of square brackets. |
s |
Delete the current character and go to insert mode. |
S |
Delete the current line and go to insert mode. |
>> |
Indent current line. |
<< |
Unindent current line. |
Copy(Yank) and Paste
yy |
Copy the current line |
yw |
Copy the current word from cursor till space/punctuation |
yW |
Copy the current word from cursor till space. |
yiw |
Copy the current word. |
yiB |
Copy the block. |
yi' |
Copy everything inside a pair of single quotes. |
yi" |
Copy everything inside a pair of double-quotes. |
yi( |
Copy everything inside a pair of parentheses. |
yi{ |
Copy everything inside a pair of curly braces. |
yi[ |
Copy everything inside a pair of square brackets. |
p |
Paste below the current line. |
P |
Paste above the current line. |
When a text is yanked, it goes into Vim registers and Vim has many registers. You can see contents present in all the Vim registers by running the Vim command :reg.
To yank a text to a particular register, you can prefix the yank command with "{register}. For example, to yank the text to register “1”, you can use the shortcut "1yy.
Similarly, you can paste the contents of a particular register. For example, "2p will paste the content present in register “2”.
Undo and Redo
u |
Undo the last action. |
U |
Redo the last action. |
These commands can be repeated by prefixing a number. For example, to undo last 3 actions, you can use 3u.
Toggling Case
~ |
Toggle case at the current cursor position. |
gUU |
Make current line uppercase. |
guu |
Make current line lowercase. |
You can also use gu and gU with a motion. For example, to convert 3 lines to uppercase, you can use gU3j.
Repeat Last Change
. |
Repeats the last change. |
This is where the real power of Vim comes in. For example, say you need to replace all occurrences of a word. You can first search for the word using / or ?. Then to change the word you can use ciw. After changing go back to Normal mode, hit n to go to the next occurrence. Now you can simply press . to replace the word.
What’s Next?
Once you get hold of these Vim keyboards shortcuts, open Vim and run the command :help to open the Vim documentation or you can use the online version of Vim documentation. It provides a list of every command there is with an explanation. So, you can pick up a few more useful Vim shortcuts and also get a better understanding.
Vim Commands Cheat Sheet
Source: Vim Commands Cheat Sheet .
Introduction
Vim is a widely used, open-source Unix text editor. Learning to use Vim commands is a matter of practice and experience. That is why it is handy to have a helpful reference sheet while mastering them.
In this tutorial, you will find the most important Vim commands as well as a downloadable cheat sheet.

Moving Inside a File
You can move the cursor within a file by single characters, words, tokens, or lines.
According to Vim, a word can be a group of letters, numbers, and underscores. On the other hand, a token is anything separated by whitespace and can include punctuation.
Additionally, you can move to different parts of a text by screen view.
Moving by Characters, Words and Tokens
The basic keys for moving the cursor by one character are:
-
h– move the cursor left -
j– move the cursor down -
k– move the cursor up -
l– move the cursor right
You can also use these keys with a number as a prefix to move in a specified direction multiple times. For example, if you run 5j the cursor moves down 5 lines.
-
b– move to the start of a word -
B– move to the start of a token -
w– move to the start of the next word -
W– move to the start of the next token -
e– move to the end of a word -
E– move to the end of a token
For instance, you have the noun phrase “step-by-step” as part of a text and the cursor is placed at the end of it. The first time you press b, the cursor moves back to “step-by-step”. However, if you use B, the cursor moves all the way back to: “step-by-step” since there is no whitespace between these characters.
Moving by Lines
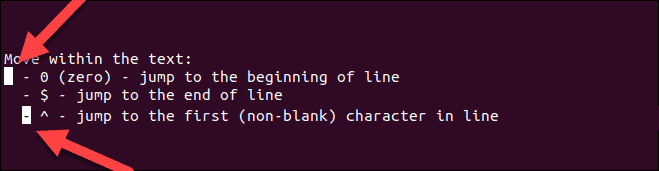
-
0(zero) – jump to the beginning of the line -
$– jump to the end of the line -
^– jump to the first (non-blank) character of the line -
#G/#gg/:#– move to a specified line number (replace # with the line number)
To illustrate the difference between 0 and ^, take a look at the following example. In the first bullet, the command moves the cursor to the blank space before the bullet. On the other hand, in the third bullet, the ^ key moves the cursor to the hyphen (the first character in the line).
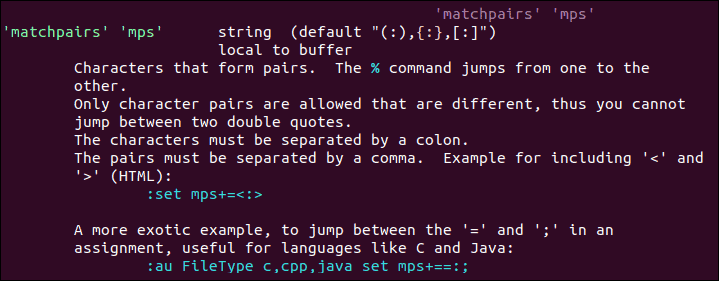
To learn more about matchpairs and how to use more than the default supported pairs, run the following commands in the text editor: :h matchpairs.
Moving by Screens
The following commands are used as a quick way to move within the text without scrolling.
-
Ctrl + b– move back one full screen -
Ctrl + f– move forward one full screen -
Ctrl + d– move forward 1/2 a screen -
Ctrl + u– move back 1/2 a screen -
Ctrl + e– move screen down one line (without moving the cursor) -
Ctrl + y– move screen up one line (without moving the cursor) -
Ctrl + o– move backward through the jump history -
Ctrl + i– move forward through the jump history -
H– move to the top of the screen (H=high) -
M– move to the middle of the screen (M=middle) -
L– move to the bottom of the screen (L=low)
Inserting Text
-
i– switch to insert mode before the cursor -
I– insert text at the beginning of the line -
a– switch to insert mode after the cursor -
A– insert text at the end of the line -
o– open a new line below the current one -
O– open a new line above the current one -
ea– insert text at the end of the word -
Esc– exit insert mode; switch to command mode
Some of these commands switch between command and insert mode. By default, Vim launches in command mode, allowing you to move around and edit the file. To switch to command mode, use the Esc key.
On the other hand, the insert mode enables you to type and add text into the file. To move to insert mode, press i.

Editing Text
-
r– replace a single character (and return to command mode) -
cc– replace an entire line (deletes the line and moves into insert mode) -
C/c$– replace from the cursor to the end of a line -
cw– replace from the cursor to the end of a word -
s– delete a character (and move into insert mode) -
J– merge the line below to the current one with a space in between them -
gJ– merge the line below to the current one with no space in between them -
u– undo -
Ctrl+r– redo -
.– repeat last command
Note: Bear in mind that Vim undoes and redoes changes by entries (changes made within one insert mode session). For more details, refer to the article How to Undo and Redo Changes in Vim.
Cutting, Copying And Pasting
-
yy– copy (yank) entire line -
#yy– copy the specified number of lines -
dd– cut (delete) entire line -
#dd– cut the specified number of lines -
p– paste after the cursor -
P– paste before the cursor
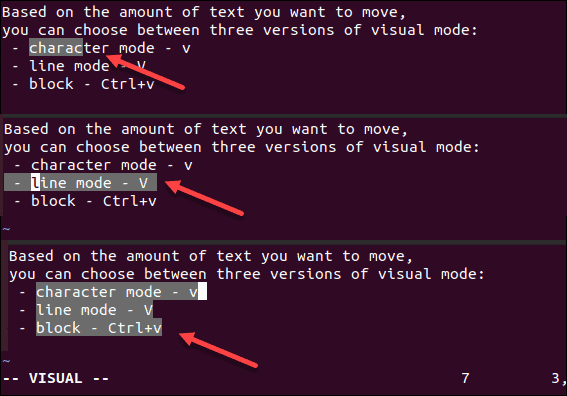
Marking Text (Visual Mode)
Apart from command mode and insert mode, Vim also includes visual mode. This mode is mainly used for marking text.
Based on the chunk of text you want to select, you can choose between three versions of visual mode: character mode, line mode, and block mode.
-
v– select text using character mode -
V– select lines using line mode -
Ctrl+v– select text using block mode
Once you have enabled one of the modes, use the navigation keys to select the desired text.
-
o– move from one end of the selected text to the other -
aw– select a word -
ab– select a block with () -
aB– select a block with {} -
at– select a block with <> -
ib– select inner block with () -
iB– select inner block with {} -
it– select inner block with <>
Visual Commands
Once you have selected the desired text in visual mode, you can use one of the visual commands to manipulate it. Some of them include:
-
y– yank (copy) the marked text -
d– delete (cut) the marked text -
p– paste the text after the cursor -
u– change the market text to lowercase -
U– change the market text to uppercase
Search in File
-
*– jump to the next instance of the current word -
#– jump to previous instance of the current word -
/pattern– search forward for the specified pattern -
?pattern– search backward for the specified pattern -
n– repeat the search in the same direction -
N– repeat the search in the opposite direction
Saving and Exiting File
-
:w– save the file -
:wq/:x/ZZ– save and close the file -
:q– quit -
:q!/ZQ– quit without saving changes -
:w new_file_name– save the file under a new name and continue editing the original -
:sav– save the file under a new name and continue editing the new copy -
:w !sudo tee %– write out the file using sudo and tee command
Working with Multiple Files
-
:e file_name– open a file in a new buffer -
:bn– move to the next buffer -
:bp– go back to previous buffer -
:bd– close buffer -
:b#– move to the specified buffer (by number) -
:b file_name– move to a buffer (by name) -
:ls– list all open buffers

-
:sp file_name– open a file in a new buffer and split viewport horizontally -
:vs file_name– open a file in a new buffer and split viewport vertically -
:vert ba– edit all files as vertical viewports -
:tab ba– edit all buffers as tabs -
gt– move to next tab -
gT– move to previous tab
-
Ctrl+ws– split viewport -
Ctrl+wv– split viewport vertically -
Ctrl+ww– switch viewports -
Ctrl+wq– quit a viewport - Ctrl+wx – exchange current viewport with next one
-
Ctrl+=– make all viewports equal in height and width
Marks and Jumps
-
m[a-z]– mark text using character mode (fromatoz) -
M[a-z]– mark lines using line mode (fromatoz) -
`a- jump to position markeda -
`y`a– yank text to position marked >a> -
`.– jump to last change in file -
`0– jump to position where Vim was last exited -
``– jump to last jump -
:marks– list all marks -
:jumps– list all jumps -
:changes– list all changes -
Ctrl+i– move to next instance in jump list -
Ctrl+o– move to previous instance in jump list -
g,– move to next instance in change list -
g;– move to previous instance in change list
Macros
-
qa– record macroa -
q– stop recording macro -
@a– run macroa -
@@– run last macro again
Enabling Vim Color Schemes
-
:colorscheme [colorscheme_name]– change to specified scheme -
:colorscheme [space]+Ctrl+d– list available Vim color scheme
The list of Vim color schemes shows you the ones that come by default with the text editor, as in the image below:

You can also configure the color settings manually or download user-made schemes. Find out how to do so in How to Change and Use Vim Color Schemes.
This article includes a one-page Vim commands reference sheet. Save the cheat sheet in PDF format by clicking the Download Cheat Sheet button below.

Conclusion
Knowing basic Vim commands is useful as most Linux distributions have it installed by default. Once you get use to using Vim commands, mastering Vim should be simple.
Until then, keep a Vim cheat sheet at hand.
Vimtutor Summaries
Source Vim Tutorial for Beginners vimtutor - SysTutorials.
   ** To move the cursor, press the h,j,k,l keys as indicated. **
         ^
         k          Hint:  The h key is at the left and moves left.
       < h   l >           The l key is at the right and moves right.
         j             The j key looks like a down arrow.
         v
  1. Move the cursor around the screen until you are comfortable.

  2. Hold down the down key (j) until it repeats.
     Now you know how to move to the next lesson.

  3. Using the down key, move to Lesson 1.2.

NOTE: If you are ever unsure about something you typed, press <ESC> to place
      you in Normal mode.  Then retype the command you wanted.

NOTE: The cursor keys should also work.  But using hjkl you will be able to
      move around much faster, once you get used to it.  Really!
Lesson 1 SUMMARY
  1. The cursor is moved using either the arrow keys or the hjkl keys.
     h (left)   j (down)       k (up)       l (right)

  2. To start Vim from the shell prompt type:  vim FILENAME <ENTER>

  3. To exit Vim type:     <ESC>   :q!   <ENTER>  to trash all changes.
         OR type:      <ESC>   :wq   <ENTER>  to save the changes.

  4. To delete the character at the cursor type:  x

  5. To insert or append text type:
     i   type inserted text   <ESC>     insert before the cursor
     A   type appended text   <ESC>         append after the line

NOTE: Pressing <ESC> will place you in Normal mode or will cancel
      an unwanted and partially completed command.

Now continue with Lesson 2.
Lesson 2 SUMMARY
  1. To delete from the cursor up to the next word type:    dw
  2. To delete from the cursor to the end of a line type:    d$
  3. To delete a whole line type:    dd

  4. To repeat a motion prepend it with a number:   2w
  5. The format for a change command is:
               operator   [number]   motion
     where:
       operator - is what to do, such as  d  for delete
       [number] - is an optional count to repeat the motion
       motion   - moves over the text to operate on, such as  w (word),
          $ (to the end of line), etc.

  6. To move to the start of the line use a zero:  0

  7. To undo previous actions, type:           u  (lowercase u)
     To undo all the changes on a line, type:  U  (capital U)
     To undo the undo's, type:             CTRL-R
Lesson 3 SUMMARY
  1. To put back text that has just been deleted, type   p .  This puts the
     deleted text AFTER the cursor (if a line was deleted it will go on the
     line below the cursor).

  2. To replace the character under the cursor, type   r   and then the
     character you want to have there.

  3. The change operator allows you to change from the cursor to where the
     motion takes you.  eg. Type  ce  to change from the cursor to the end of
     the word,  c$  to change to the end of a line.

  4. The format for change is:

     c   [number]   motion

Now go on to the next lesson.
Lesson 4 SUMMARY
  1. CTRL-G  displays your location in the file and the file status.
             G  moves to the end of the file.
     number  G  moves to that line number.
            gg  moves to the first line.

  2. Typing  /  followed by a phrase searches FORWARD for the phrase.
     Typing  ?  followed by a phrase searches BACKWARD for the phrase.
     After a search type  n  to find the next occurrence in the same direction
     or  N  to search in the opposite direction.
     CTRL-O takes you back to older positions, CTRL-I to newer positions.

  3. Typing  %  while the cursor is on a (,),[,],{, or } goes to its match.

  4. To substitute new for the first old in a line type    :s/old/new
     To substitute new for all 'old's on a line type       :s/old/new/g
     To substitute phrases between two line #'s type       :#,#s/old/new/g
     To substitute all occurrences in the file type    :%s/old/new/g
     To ask for confirmation each time add 'c'         :%s/old/new/gc
Lesson 5 SUMMARY
  1.  :!command  executes an external command.

      Some useful examples are:
     (MS-DOS)     (Unix)
      :!dir        :!ls        -  shows a directory listing.
      :!del FILENAME   :!rm FILENAME   -  removes file FILENAME.

  2.  :w FILENAME  writes the current Vim file to disk with name FILENAME.

  3.  v  motion  :w FILENAME  saves the Visually selected lines in file
      FILENAME.

  4.  :r FILENAME  retrieves disk file FILENAME and puts it below the
      cursor position.

  5.  :r !dir  reads the output of the dir command and puts it below the
      cursor position.
Lesson 6 SUMMARY
  1. Type  o  to open a line BELOW the cursor and start Insert mode.
     Type  O  to open a line ABOVE the cursor.

  2. Type  a  to insert text AFTER the cursor.
     Type  A  to insert text after the end of the line.

  3. The  e  command moves to the end of a word.

  4. The  y  operator yanks (copies) text,  p  puts (pastes) it.

  5. Typing a capital  R  enters Replace mode until  <ESC>  is pressed.

  6. Typing ":set xxx" sets the option "xxx".  Some options are:
    'ic' 'ignorecase'   ignore upper/lower case when searching
    'is' 'incsearch'    show partial matches for a search phrase
    'hls' 'hlsearch'    highlight all matching phrases
     You can either use the long or the short option name.

  7. Prepend "no" to switch an option off:   :set noic
Lesson 7 SUMMARY
  1. Type  :help  or press <F1> or <Help>  to open a help window.

  2. Type  :help cmd  to find help on  cmd .

  3. Type  CTRL-W CTRL-W  to jump to another window

  4. Type  :q  to close the help window

  5. Create a vimrc startup script to keep your preferred settings.

  6. When typing a  :  command, press CTRL-D to see possible completions.
     Press <TAB> to use one completion.
vimtutor summary
  This concludes the Vim Tutor.  It was intended to give a brief overview of
  the Vim editor, just enough to allow you to use the editor fairly easily.
  It is far from complete as Vim has many many more commands.  Read the user
  manual next: ":help user-manual".

  For further reading and studying, this book is recommended:
    Vim - Vi Improved - by Steve Oualline
    Publisher: New Riders
  The first book completely dedicated to Vim.  Especially useful for beginners.
  There are many examples and pictures.
  See http://iccf-holland.org/click5.html

  This book is older and more about Vi than Vim, but also recommended:
    Learning the Vi Editor - by Linda Lamb
    Publisher: O'Reilly & Associates Inc.
  It is a good book to get to know almost anything you want to do with Vi.
  The sixth edition also includes information on Vim.

  This tutorial was written by Michael C. Pierce and Robert K. Ware,
  Colorado School of Mines using ideas supplied by Charles Smith,
  Colorado State University.  E-mail: bware@mines.colorado.edu.

  Modified for Vim by Bram Moolenaar.
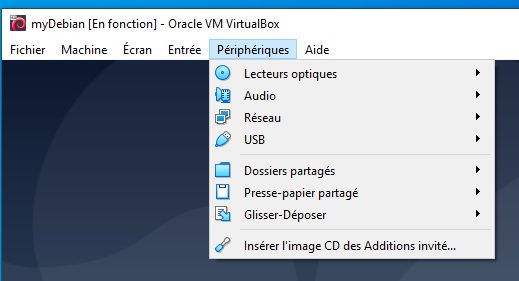
VirtualBox - Installer les Additions invité sur une image debian
Disque des additions
Après que la machine soit lancée, insérer l'image CD des Additions invité.
Dépendances nécessaires
sudo apt-get install build-essential module-assistant gcc make perl dkms
sudo m-a prepare
Installation des additions
sudo mount /media/cdrom
sudo sh /media/cdrom/VBoxLinuxAdditions.run
sudo reboot
Sway Cheatsheet
https://i3wm.org/docs/userguide.html
https://github.com/swaywm/sway/wiki
Throughout this guide, the Sway logo will be used to refer to the configured modifier. This is the Super/ (Mod4) by default, with key (Mod1) being a popular alternative.
Basics
| open new terminal | |
| focus left | |
| focus down | |
| focus up | |
| focus right | |
| focus parent | |
| toggle focus mode |
Moving windows
| move window left | |
| move window down | |
| move window up | |
| move window right |
Modifying windows
| toggle fullscreen | |
| split a window vertically | |
| split a window horizontally | |
| resize mode |
Look at the “Resizing containers / windows” section of the user guide.
Changing the container layout
| default (toggle vertical/horizontal) | |
| stacking | |
| tabbed |
Floating
| toggle floating | |
| drag floating |
Using workspaces
| switch to another workspace | |
| move a window to another workspace |
Opening applications / Closing windows
| open application launcher (dmenu) | |
| kill a window |
Restart / Exit
| reload the configuration file | |
| exit Sway |
Copyright © 2012, Michael Stapelberg
All rights reserved
Designed by Zeus Panchenko, updated by Moritz Bandemer and Davide Depau
Permission is granted to copy, distribute and/or modify this document provided the copyright notice and this permission notice are preserved on all copies.
Connexion automatique d'un utilisateur sous Debian
Connexion automatique
Un programme permet de les terminaux : getty. L'idée est donc de lui demander de connecter automatiquement un utilisateur lorsqu'il est en tty1, autrement dit depuis le terminal 1 du PC.
La démarche est expliquée dans la documentation de Arch : getty - ArchWiki.
Il convient d'abord de créer un fichier de configuration alternative afin de pas perdre ses réglages lors d'une mise à jour du système :
sudo systemctl edit getty@tty1.service
Cela va créer un fichier override.conf reprenant tous la configuration d'origine en commentaire. On décommente et modifie le fichier afin d'avoir les lignes suivantes :
[Service]
# # the VT is cleared by TTYVTDisallocate
# # The '-o' option value tells agetty to replace 'login' arguments with an
# # option to preserve environment (-p), followed by '--' for safety, and then
# # the entered username.
ExecStart=
ExecStart=-/sbin/agetty --noclear --autologin <username> %I $TERM
-
[Service]permet d'indiquer l'emplacement des modifications à apporter. - Le premier
[ExecStart]permet de remettre à zéro le précédent réglage. - La dernière ligne permet de connecter l'utilisateur
<username>sans entrer de mot de passe.
Pour ma part, l'édition s'est faite dans Nano, au moment de l'enregistrement, j'ai du changer le nom du fichier : /etc/systemd/system/getty@tty1.service.d/override.conf.
Si on laisse les options -o '-p -f -- \\u', le nom d'utilisateur sera pré-rempli, mais il faudra toujours entrer le mot de passe.
Lancement automatique d'une commande
Cela se joue dans le fichier .zshrc de l'utilisateur.
Étant donné que je fais appel à une fonction dans mon script (c'est un peu imbriqué dans tous les sens mon affaire…), je le place à la toute fin de mon fichier.
[[ `tty` == /dev/tty1 ]] && <command>
La commande ne respecte pas le standard POSIX, mais ça va bien pour zsh. Autrement, j'aurais pu mettre la commande suivante, sans quoi zsh interprète == :
[ `tty` "==" /dev/tty1 ] && <command>
Sources
- linux - Automatic root login in Debian 8.0 (console only) - Super User
- getty - ArchWiki
-
Why does
==behave differently inside...in zsh and bash - Unix & Linux Stack Exchange
Docker
Différents affichages avec docker en CLI
Les containers, leur image, le port, la taille sur 2 lignes
docker ps -a -q --format 'table {{ .Names }}\t{{ .Status }}\t{{ .Size }}\n{{ .ID }}\t{{ .Image }}{{ if .Ports }}{{ with $p := split .Ports ", " }}\t{{ len $p }} port(s) on {{ end }}{{- .Networks }}{{ else }}\tNo Ports on {{ .Networks }}{{end}}\n'
NAMES          STATUS    SIZE
CONTAINER ID   IMAGE     5 port(s) on NETWORKS

pihole         Up 21 hours (healthy)   25.5MB (virtual 327MB)
a88a9053be02   pihole/pihole:latest    4 port(s) on pihole_default

nextcloud_app_1   Up 21 hours        6.3kB (virtual 1.14GB)
124466fed567      nextcloud:27.0.1   1 port(s) on nextcloud_default

glpi_mariadb   Up 21 hours     2B (virtual 403MB)
737cc3bf26ae   mariadb:10.11   1 port(s) on glpi_default

nextcloud_db_1   Up 21 hours     2B (virtual 403MB)
febad01cc316     mariadb:10.11   1 port(s) on nextcloud_default

nginx          Up 21 hours                        25.5kB (virtual 148MB)
b722ae3d6ff4   lscr.io/linuxserver/nginx:latest   2 port(s) on nginx_default

glpi_glpi      Up 21 hours   1.57MB (virtual 283MB)
9f5255c550b8   diouxx/glpi   2 port(s) on glpi_default

yacht_app_1    Up 21 hours                                 12.7MB (virtual 425MB)
53a04b972ad2   selfhostedpro/yacht:latest-2022-06-03--21   1 port(s) on yacht_default
Lister les images inutilisées
RUNNINGS_IMAGES=$(docker ps --format {{.Image}})
docker images --format "table {{.ID}}\t{{.Size}}\t{{.Repository}}:{{.Tag}}" \
| grep -v "$RUNNINGS_IMAGES"
unset RUNNINGS_IMAGES
Exemple de rendu :
root@localhost:/# RUNNINGS_IMAGES=$(docker ps --format {{.Image}}); docker images --format "table {{.ID}}\t{{.Size}}\t{{.Repository}}:{{.Tag}}" | grep -v "$RUNNINGS_IMAGES" ; unset RUNNINGS_IMAGES
IMAGE ID       SIZE      REPOSITORY:TAG
cb09058f6eed   418MB     synapse:mainline
a8bb53036fd3   93.2MB    otel/opentelemetry-collector:latest
b9559acf35ef   60.3MB    jaegertracing/all-in-one:latest
b50ee6079167   223MB     registry.gitlab.com/mb-saces/synatainer:latest
2f20774a9bec   724MB     ttrss:latest
e148e14f6f5b   243MB     halfshot/matrix-appservice-discord:latest
Environnement de bureau
XFCE
KDE Plasma
Gnome
Gnome - Raccourcis sur le bureau
Application classique
Il est possible d'avoir des raccourcis sur le bureau de Gnome. Pour cela, il faut passer par une extension…
Lien de l'extension : https://extensions.gnome.org/extension/2087/desktop-icons-ng-ding/
- Suivre les instructions dans l'encadré violet.
- Installer l'extension pour le navigateur ;
- Installer un autre paquet dans le cas de Firefox.
- Tous les détails ici : https://linuxiac.com/install-gnome-shell-extensions/
- Lancer l'application
Extensions. - Paramétrer l'extension
Desktop Icons NG (DING). - Copier des fichiers
.desktopdepuis/usr/share/applications/dans le dossier~/Bureau/:- Exemple :
cp /usr/share/applications/firefox.desktop ~/Bureau/
- Exemple :
- Autoriser le raccourci à être exécuter comme un programme.
- Depuis le bureau : Autoriser l'éxecution.
Application AppImage
Exemple avec Molotov
Source :
- How to create desktop shortcut or launcher on Linux.
- How To Use AppImage in Linux Complete Guide - It's FOSS
L'idée est de créer un fichier molotov.desktop qui pointe vers l'application.
Ce fichier contient les données suivantes :
[Desktop Entry]
Version=1.0
Name=Molotov
GenericName=Molotov
GenericName[fr]=Molotov
Comment=Watch TV
Comment[fr]=Regarder la télévision
Exec=/home/<username>/Applications/Molotov-4.5.1.AppImage
Icon=/home/<username>/Applications/Molotov.png
Terminal=false
Type=Application
Categories=Video;
Il faut juste changer le <username> par le nom de session. Ensuite il est à placer dans le dossier Bureau.
Il faut télécharger le fichier qui contient l'icône. Ce dernier est à placer dans le dossier Application, à côté de Molotov-4.5.1.AppImage.
Une fois l'icône apparue sur le bureau, il faut Autoriser l'exécution.
Quand il y a un changement de version sur l'application Molotov, il faudra modifier le fichier molotov.desktop.
Permettre le défilement naturel du touchpad dans XFCE (défilement inversé)
On teste la valeur du défilement vertical
synclient | grep VertScrollDelta
> VertScrollDelta = 113
Si la valeur est positive, c'est que le défilement n'est pas naturel.
On édite le fichier de conf
sudo vim /usr/share/X11/xorg.conf.d/40-libinput.conf
[…]
Section "InputClass"
        Identifier "libinput touchpad catchall"
        MatchIsTouchpad "on"
        MatchDevicePath "/dev/input/event*"
        Driver "libinput"
	Option "VertScrollDelta" "-71" # ligne à ajouter
	Option "HorizScrollDelta" "-71" # ligne à ajouter
EndSection
[…]
On reboot & check
Soit on redémarre complètement l'ordinateur, soit :
sudo systemctl restart lightdm.service
# ou sddm.service, on peut vérifier avec ps aux | grep -i "xorg"
Il faut enregistrer le travail en cours, la déconnexion de session est brutale…
On teste :
synclient | grep VertScrollDelta
> VertScrollDelta = -71
Personnalisation de KDE Plasma
Basée sur une vidéo de LinuxScoop : Make Your KDE Plasma Desktop Look Better.
Version de KDE Plasma : 5.22.4.
Configuration initiale
Dans Configuration du système → Comportement de l'espace de travail → …
-
Effets de bureau- Rechercher
Flou.- Cliquer
Configurer. - Régler
Intensité du flouà 50 %. - Réduire
Intensité du bruità 0. - Valider.
- Cliquer
- Rechercher
Glisser vers l'arrière.- Cocher la case.
- Rechercher
Estompe les inactifs.- Cocher la case.
- Cliquer
Configurer. - Cocher la case
Bureau. - Valider.
- Appliquer.
- Rechercher
-
Bords de l'écran- Désactiver le bord central gauche : clic et choisir
Aucune action. - Vérifier le bord supérieur gauche : clic et contrôler
Présentation des fenêtres - Tous les bureaux. - Appliquer.
- Désactiver le bord central gauche : clic et choisir
-
Bureau virtuels- Cliquer sur le bouton
∧pour passer à4 lignes. - Cliquer sur le bouton ajouter pour avoir 4 ligne avec un bureau chacune.
- Renommer les bureaux.
- Cliquer sur le bouton de configuration à côté de
Glissage.- Cocher
Faire glisser les panneaux. - Valider
- Cocher
- Appliquer.
- Cliquer sur le bouton
Dans Configuration du système → Gestion des fenêtres → …
-
Comportement des fenêtres-
Avancé- À
Placement de la fenêtrechoisirCentrée - Décocher
Permettre aux applications de KDE de se rappeler les positions de leurs propres fenêtres […]. - Appliquer
- À
-
-
Scripts de KWin- Cliquer
Obtenir de nouveaux scripts…- Cliquer
⋮pour rechercherblur.- Installer
Force Blur.
- Installer
- Cliquer
⋮pour rechercherlatte.- Installer
Latte Window Colors.
- Installer
- Fermer la fenêtre modale.
- Cliquer
- Cocher les cases des deux nouveaux scripts.
- Appliquer
- Cliquer
-
Règles de la fenêtre- Cliquer sur le bouton
Importer…. - Télécharger le repo
https://github.com/manilarome/the-glorious-plasma-setup.git, également disponible en pièce-jointe the-glorious-plasma-setup.zip. - Sélectionner le fichier
glorious.kwinrule. - Appliquer
- Cliquer sur le bouton
Dans Configuration du système → Affichage et Écran → …
-
Compositeur- Dans
Méthode de mise à l'échellesélectionnerDirecte - Dans
Moteur de rendusélectionnerOpenGL 3.1 - Appliquer.
- Fermer.
- Dans
Lancer KRunner : alt + espace (ou ⌥ + espace).
- Cliquer
Configurer- Régler
Positionnement sur l'écransurAu centre. - Appliquer.
- Fermer.
- Régler
Dans Configuration du système → Démarrage et arrêt → …
Archive comprenant les fond d'écran dans un dossier Google Drive ou Fonds d'écran.zip.
- Cliquer droit sur le bureau :
Configurer le bureau et le fonds d'écran….- Cliquer sur
+ Ajouter une image…. - Choisir une image, par exemple
2560x1600. - Appliquer.
- Cliquer sur
Installer et configurer Lighty Window Decoration
Installation de lightly-qt
yay -S lightly-qt
Configuration de Style de composant graphique Lightly
Lancer la recherche de lightly pour lancer l'app Style de composant graphique Lightly.
-
General- Cocher
Draw highlight on active tab.
- Cocher
-
Transparency- Régler le slider de
Menuà environ 90 %. - Régler le slider de
Sidebarsà environ 80 %. - Appliquer.
- Régler le slider de
Installer et configurer les styles Plasma, application et thème gtk
Dans Configuration du système → Apparence → …
-
Style Plasma- Cliquer
Télécharger de nouveaux styles Plasma…. - Recherche
whitesur. - Installer
WhiteSur dark plasma. - Fermer la fenêtre modale.
- Sélectionner
WhiteSur-dark. - Appliquer.
- Cliquer
-
Style d'applications- Sélectionner
Lghtly. - Appliquer.
- Cliquer
Configurer le style des applications « GNOME / GTK »…. - Cliquer
Obtenir de nouveaux styles d'applications GNOME / GTK…. - Cliquer
⋮pour rechercherflat-remix. - Installer
Flat Remix BLue [GTK/Elementary/Budgie]. - Installer
05-Flat-Remix-GTK-Blue-Dark_20201129.tar.xz. - Fermer la fenêtre modale.
- Dans la liste déroulante de
Thème GTK, sélectionnerFlat-Remix-GTK-BLue-Dark(si besoin sortir et retourner dansConfigurer le style des applications « GNOME / GTK »…).
- Sélectionner
-
Décoration de fenêtres- Onglet
Thème.- Sélectionner
Lghtly. - Appliquer.
- Sélectionner
- Onglet
Boutons de la barre de titre.- Retirer les deux icônes de gauche (KDE et épingle).
- Retirer l'icône
?à droite. - Déplacer les icônes de droite vers la gauche.
- Appliquer.
- Onglet
Configurer les couleurs et polices du système
Dans Configuration du système → Apparence → …
-
Couleurs- Cliquer
Installer à partir d'un fichier…. - Depuis le dossier
the-glorious-plasma-setup, ouvrir l'aborescence jusqu'au fichierGloriousDark.colors. - Ouvrir.
- Sélectionner
GloriousDark. - Appliquer.
- Cliquer
Polices
- Depuis le dossier
the-glorious-plasma-setup.- Extraire le dossier
fontségalement disponible en pièce-jointe .fonts.zip. - Couper toutes les polices du dossier.
- Dans le
Dossier personnel, créer un dossier.fonts. - Ouvrir ce dossier.
- Coller les polices.
- Extraire le dossier
- Dans
Configuration du système→Apparence→Polices.- Cliquer
A⋮ Ajuster toutes les polices….- Cocher
Police. - Sélectionner
Roboto. - Cocher
Style de policeetTaille. - Valider.
- Cocher
- Cliquer sur l'icône en former de crayon correspondant à
Police à chasse fixe.- Sélectionner
Roboto Mono Thin [GOOG]. - Valider.
- Sélectionner
- Appliquer.
- Cliquer
Installer les icônes et les pointeurs
Dans Configuration du système → Apparence → …
-
Icônes- Cliquer
Obtenir de nouvelles icônes…. - Organiser par
Téléchargements. - Rechercher
tela-icon-theme.- Cliquer
Installer. - Installer
Tela-blue.tar.xz.
- Cliquer
- Rechercher
Papiruspar x-varlesh-x.- Cliquer
Installer. - Installer
papirus-icon-theme-[…].tar.xz.
- Cliquer
- Fermer la fenêtre modale.
- Sélectionner
Tela blue. - Appliquer.
- Cliquer
-
Pointeurs- Cliquer
Obtenir de nouveaux pointeurs…. - Rechercher
vimix.- Cliquer
Installer. - Installer
01-Vimix-cursors.tar.xz.
- Cliquer
- Fermer la fenêtre modale.
- Sélectionner
Vimix Cursors(sortir et revenir dansPointeurssi besoin). - Appliquer.
- Cliquer
Installer les composants graphiques Plasmoids
- Depuis le bureau.
- Clic droit.
- Cliquer
Ajouter des composants graphiques…. - Cliquer
Obtenir de nouveaux composants graphiques…. - Cliquer
Télécharger de nouveaux composants graphiques. - Agrandir la fenêtre si le champ de recherche n'est pas visible.
- Recherche
Application title.- Cliquer
Installer.
- Cliquer
- Recherche
Event calendar.- Cliquer
Installer.
- Cliquer
- Recherche
Netspeed Widget.- Cliquer
Installer.
- Cliquer
- Recherche
Better inline clock.- Cliquer
Installer.
- Cliquer
- Recherche
Launchpad Plasma.- Cliquer
Installer…. - Installer
launchpadPlasma.tar.gz.
- Cliquer
- Recherche
Latte Separator.- Cliquer
Installer.
- Cliquer
- Recherche
Latte SideBar Button.- Cliquer
Installer…. - Installer
applet-latte-sidebar-button-0.2.0.plasmoid.
- Cliquer
- Recherche
Latte Spacer.- Cliquer
Installer.
- Cliquer
- Recherche
Kpple Menu.- Cliquer
Installer.
- Cliquer
- Recherche
Window Title Applet.- Cliquer
Installer…. - Installer
applet-window-title-0.7.0.plasmoid.
- Cliquer
- Recherche
Big Sur - Inline Battery.- Cliquer
Installer.
- Cliquer
Installer et configurer Latte-Dock
Télécharger le fichier bluesky.layout.latte à l'adresse www.pling.com/p/1559457 également disponible en pièce-jointe bluesky.layout.latte.
Installer pamac-aur :
yay -S pamac-aur
- Lancer
Lattedepuis la liste des applications.- Survoler
Layouts. - Cliquer
Edit layouts…. - Cliquer
Import. - Cliquer
Import From Local Files… - Sélectionner le fichier
bluesky.layout.latte. - Appliquer.
- Cliquer
Switch.
- Survoler
- Clic droit sur la barre des tâches inférieures.
- Cliquer
Modifier Tableau de bord…. - Cliquer
Plus d'options…. - Clique
Supprimer le tableau de bord. - Fermer les deux fenêtres modales ouvertes pour cette modification.
- Cliquer
- Se rendre dans le dossier
~/.local/share/plasma/plasmoids/org.kpple.kppleMenu/.- Clique droit sur
metadata.desktop. - Ouvrir avec
Kate. - Commenter la ligne 87 :
#Icon=start-here-kde. - Ajouter la ligne :
Icon=draw-circleà la ligne en-dessous. -Redémarrer.
- Clique droit sur
- Clic droit sur le rond-blanc de lancement.
- Cliquer
Configurer Menu Kpple…. - Cliquer
Afficher le mode avancé. - Dans le champ
App Storerenseignerpamac-manager. - Appliquer.
- Fermer la fenêtre.
- Cliquer
- Si les icônes de dossiers ne comportent pas les bon icônes…
- Faire un clic droit sur une icône.
- Cliquer
Configurer une Vue de dossier…. - Sélectionner les bons emplacements personnalisés.
- Recommencer pour chaque dossier.
Installer et configurer uLauncher
yay -S ulauncher
- Cliquer sur la loupe de
Launchpad Plasmadans le dock.- Rechercher
ulauncher. - Extraire le fichier ts-dark.zip
- Copier le dossier
ts-dark. - Se rendre dans le dossier
~/.config/ulauncher/. - Créer un dossier
user-themes. - Coller le dossier
ts-dark. - Fermer l'explorateur.
- Rechercher
- Lancer
ulauncheravec les touches ctrl + espace.- Cliquer sur le roue dentée.
- Dans
Color Themesélectionnerts-dark. - Cocher
Launch at Login. - Fermer.
Installer et configurer Conky
yay -S conky-lua-nv
sudo pacman -S jq curl
-
Extraire l'archive .conky.zip.
- Coller le dossier à la racine du dossier utilisateur.
- Modifier le fichier
lslogins --logins=$(whoami) --output=GECOS | tail -1 - Renommer le dossier en ajoutant un point :
.conky.
-
Lancer
Démarrage automatiquedepuis leLaunchpad Plasma.- Cliquer sur le bouton
+ Ajouter…. - Cliquer
+ Ajouter un script de connexion…. - Cliquer sur la roue dentée pour
Afficher les fichiers cachés. - Dans le dossier
.conkysélectionner le fichierstart_conky.sh. - Ouvrir.
- Fermer la fenêtre.
- Cliquer sur le bouton
-
Se rendre sur le site openweathermap.org pour obtenir l'ID de la ville souhaitée.
- Éditer le fichier
~/.conky/Izar/scripts/weather.sh. - Modifier la valeur de
city_id. - Enregistrer.
- Éditer le fichier
-
Éditer le fichier
~/.conky/Izar/Izar-new.- Ligne 51, remplacer
{time %I:%M }par{time %H:%M }. - Ligne 52, remplacer
HelloparSalut. - Modifier la fonction dans la même ligne :
{execi 6000 lslogins --logins=$(whoami) --output=GECOS | tail -1}. - Ligne 62, remplacer
Wind speed isparLa vitesse du vent est de. - Ligne 62, remplacer
And Humidity isparEt le taux d'humidité est de. - Ligne 61, remplacer
.weather[0].mainpar.weather[0].description. - Ligne 61, remplacer
is nowparest. - Sauvegarder et fermer.
- Ligne 51, remplacer
-
Éditer le fichier
~/.conky/Izar/scripts/weather.sh.- Ajouter
&lang=frà l'adresse URL pour obtenirapi.openweathermap.org/data/2.5/weather?id=${city_id}&lang=fr&appid=${api_key}. - Sauvegarder et fermer.
- Ajouter
Sinon, il y a aussi le fichier .conky_modifié.zip en pièce-jointe.
Configurer l'écran de connexion
- Dans
Configuration du système→Démarrage et arrêt→Écran de connexion (SDDM).- Cliquer
Obtenir de nouveaux thèmes « SDDM »…. - Rechercher
WhiteSur SDDM. - Installer.
- Fermer.
- Sélectionner
WhiteSur. -
Changer d'arrière-plan. -
Changer à partir d'un fichier… - Appliquer.
- Cliquer
Bon clairement, j'ai eu des bugs, SDDM ne semblait pas vouloir le prendre… J'ai dû le modifier manuellement dans les fichiers de configuration, y compris le fond d'écran. À voir si ça marche suite à une mise à jour…
Configurer Dolphin
- Lancer Dolphin.
- Clic droit sur un des icônes du
Mode d'affichage […]. - Décocher
Verrouiller les positions des barres d'outils. - Clic droit sur un des icônes du
Mode d'affichage…. - Cliquer
Configurer les barres d'outils….- Sélectionner
Barre d'emplacement. - Cliquer sur la flèche de gauche.
- Appliquer puis fermer.
- Sélectionner
- Clic droit sur un des icônes du
Mode d'affichage […]. - Décocher
Verrouiller les positions des barres d'outils.- Sélectionner
Orientation→À gauche.
- Sélectionner
- Clic droit sur
Scinder.- Décocher
Scinder.
- Décocher
- Clic droit sur un des icônes de gauche.
- Cocher
Verrouiller les positions des barres d'outils.
- Clic droit sur un des icônes du
Personnaliser ZSH
yay -S ttf-meslo-nerd-font-powerlevel10k zsh-theme-powerlevel10k-git
[…]
echo "source /usr/share/zsh-theme-powerlevel10k/powerlevel10k.zsh-theme" >> ~/.zshrc
Relancer la Konsole et répondre au question pour peronnaliser ZSH Powerline 10k.
Si besoin, pour relancer la configuration de zsh-theme-powerlevel10k :
p10k configure
That's it!!!
Gérer les dotfiles
Source : jesuswasrasta/dotfiles - How I take care of my personal dotfiles.
Les commandes sont ± propres à oh-my-zsh.
Création du repo nu
git init --bare $HOME/.dotfiles
Dépôt Git vide initialisé dans /Users/mickael/.dotfiles/
Alias propre à ce nouveau repo
echo "# –> Git for Dotfiles\nalias dfg='/usr/bin/git --git-dir=$HOME/.dotfiles/ --work-tree=$HOME'" >> $ZSH_CUSTOM/aliases.zsh
sed -i '' -e 's#/Users/mickael#$HOME#g' $ZSH_CUSTOM/aliases.zsh
omz reload
Configuration du repo
dfg config --local status.showUntrackedFiles no
dfg config --local core.excludesFile=.dotfilesignore
dfg remote add origin git@forge.tedomum.net:mickge/my-dotfiles-macbook.git
Ajouter des fichiers au repo
dfg add .zshrc
dfg commit -m "Add zshrc"
dfg push -u origin main
dfg add .gitconfig .gitignore_global
dfg commit -m "Add gitconfig gitignore_global"
dfg push
Vérifier les commits
dfg log --graph --pretty='%Cred%h%Creset -%C(auto)%d%Creset %s %Cgreen(%ar) %C(bold blue)<%an>%Creset' --stat
Exemple de .dotfilesignore
Très franchement, je ne suis pas sûr de l'utilité de ce fichier… Je l'ai fait après.
# Ignore everything
*

#############
# Except... #
#############

# zsh
!.zshrc
!.zsh_aliases

# vim & gvim
!.vimrc
!.gvimrv

# tmux
!.tmux.conf

# git
!.gitconfig
!.gitignore_global
Serveur / Server
Des astuces un peu en français, un peu en anglais… suivant mon humeur !
Certificat TLS/SSL avec Cockpit
Contexte
Par défaut, cockpit utilise des certificats auto-signés (si je ne dis pas de bêtises). Il est possible de lui faire profiter du certificat du domaine.
Commande
sudo cat <main_certificate_path> <private_certificate_path> | sudo tee /etc/cockpit/ws-certs.d/ssl.cert
Sources
- Server setup Part-3 Cockpit Setup with SSL Certificates
- How to Fix Permission Denied Error While Using Cat Command - Fedingo
Configurer DNSSEC sur un serveur CentOS8 faisant authorité avec Bind 🇫🇷
Prérequis
Vérifier la version de Bind et (re)prendre connaissance des emplacements de fichier par défaut :
named -V
BIND 9.11.26-RedHat-9.11.26-6.el8 (Extended Support Version) <id:3ff8620>
running on Linux x86_64 4.18.0-305.17.1.el8_4.x86_64 #1 SMP Wed Sep 8 14:00:07 UTC 2021
built by make with […]

default paths:
  named configuration:  /etc/named.conf
  rndc configuration:   /etc/rndc.conf
  DNSSEC root key:      /etc/bind.keys
  nsupdate session key: /var/run/named/session.key
  named PID file:       /var/run/named/named.pid
  named lock file:      /var/run/named/named.lock
  geoip-directory:      /usr/share/GeoIP
On voit ainsi que le fichier de configuration principal est /etc/named.conf.
Les fichiers de zones sont dans le dossier /var/named (l'info est dans le dossier de configuration).
Fichier de configuration
Dans la déclaration des options du fichier de configuration, ajouter les options suivantes :
options {
  […]
  recursion no;
  dnssec-enable yes;
  dnssec-validation yes;
  dnssec-lookaside auto;
};
Génération des clés
Je me suis mis en root pour la suite des opérations…
sudo su
Terminologie
Source : DNSSEC - Signer la zone DNS de l'Active Directory #B_Terminologie
-
RRSIG - Resource Record Signature
- Enregistrement signé et associé à un enregistrement d'origine (ce que l'on verra dans la console DNS à la fin de la configuration)
-
NSEC3 - Next Secure 3
- Mécanisme pour prouver qu'un enregistrement n'existe pas (on ne retourne pas rien, mais on retourne une réponse négative signée)
-
DNSKEY - DNS Key
- Stocker la clé publique (SHA256) pour permettre la vérification de la signature
-
DS - Delegation Signer
- Créer une délégation sécurisée (chaîne d'authentification sur les zones enfants)
Par ailleurs, il ne faut pas négliger le principe des clés KSK et ZSK :
-
Clé KSK - Key Signing Key
- Clé privée qui sert à signer les clés privées ZSK
-
Clé ZSK - Zone Signing Key
- Clé privée pour signer les données d'une zone
Se rendre dans le dossier de zone
cd /var/named
Créer la clés Zone Signing Key (ZSK)
D'après la doc.
dnssec-keygen -a ECDSAP256SHA256 -n ZONE <domain.name>
Ce qui produit la sortie suivante :
Generating key pair.
K<domain.name>.+xxx+xxxxx
⚠️ À noter la lettre K.
La clés publique doit être insérée dans le fichier de zone :
vim /var/named/zone.<domain.name>
[…]

$INCLUDE /var/named/K<domaine.name>.+xxx+xxxxx.key
Créer la clés Key Signing Key (KSK)
Problème
En continuant à suivre la documentation de bind9, à savoir :
dnssec-signzone -o <domain.name> zone.<domain.name>
Je me suis retrouvé avec une erreur :
dnssec-signzone: fatal: No self-signed KSK DNSKEY found.  Supply an active
key with the KSK flag set, or use '-P'.
Solution
D'après les instructions trouvées sur le site www.digitalocean.com.
dnssec-keygen -f KSK -a ECDSAP256SHA256 -n ZONE <domain.name>
Generating key pair.
K<domain.name>.+xxx+xxxxx
La clés publique doit également être insérée dans le fichier de zone :
vim /var/named/zone.<domain.name>
[…]

[…]
$INCLUDE K<domaine.name>.+xxx+xxxxx.key
Signer la zone
D'après la doc.
Pour le coup, il devient possible de signer la zone :
dnssec-signzone -o <domain.name> zone.<domain.name>
Verifying the zone using the following algorithms: ECDSAP256SHA256.
Zone fully signed:
Algorithm: ECDSAP256SHA256: KSKs: 1 active, 0 stand-by, 0 revoked
                            ZSKs: 1 active, 0 stand-by, 0 revoked
zone.<domain.name>.signed
Ce qui crée un nouveau fichier qu'il faut renseigner dans le fichier de configuration local des zones :
vim /etc/named.conf.local
zone "<domain.name>" {
  type master;
  file "zone.<domain.name>.signed";
};
En fait, il suffit de rajouter le .signed au nom de zone précédemment renseigné.
Récap des fichiers créés
Le dossier de zone contient donc 6 nouveaux fichiers :
-
K<domaine.name>.+xxx+xxxxx.keypour la clés ZSK -
K<domaine.name>.+xxx+xxxxx.privatepour la clés ZSK -
K<domaine.name>.+xxx+xxxxx.keypour la clés KSK -
K<domaine.name>.+xxx+xxxxx.privatepour la clés KSK -
zone.<domain.name>.signedpour la signature de zone -
dsset-<domain.name>.contenant des DS Record
Récupérer le DS Record
Deux façons de récupérer le DS Record pour procéder à l'enregistrement auprès de son fournisseur de zone de nom de domaine supérieur (désolé, je ne sais pas mieux m'expliquer à l'instant) :
dnssec-dsfromkey
dnssec-dsfromkey -2 K<domain.name>.+xxx+xxxxx.key
Où la clés correspond à la dernière clés créée, c'est à dire KSK.
cat
cat dsset-<domain.name>.
Pour ma part, j'ai choisi la première méthode afin de ne pas avoir de tabulation dans ma sortie.
Enfin
On relance bind :
systemctl restart named
Quitter l'utilisateur root…
On peut vérifier avec les sites https://dnssec-analyzer.verisignlabs.com, https://dnschecker.org, https://www.nslookup.io/…
Ou en ligne de commande :
dig @9.9.9.9 <domain.name>. DNSKEY +dnssec +cd +multiline
; <<>> DiG 9.10.6 <<>> @9.9.9.9 <domaine.name>. DNSKEY +dnssec +cd +multiline
; (1 server found)
;; global options: +cmd
;; Got answer:
;; ->>HEADER<<- opcode: QUERY, status: NOERROR, id: <number>
;; flags: qr rd ra ad cd; QUERY: 1, ANSWER: 4, AUTHORITY: 0, ADDITIONAL: 1

;; OPT PSEUDOSECTION:
; EDNS: version: 0, flags: do; udp: 512
;; QUESTION SECTION:
;<domaine.name>.	IN DNSKEY

;; ANSWER SECTION:
<domaine.name>.	43200 IN DNSKEY	257 3 13 (
				1WclJbuqBHhaiqL0W9EO7ZaLd9aaBe1BGXNbE4cjVqutjH1T
				XZP9kFzcQopEZjwIbvv2LT18tB6GdvBfyyXxV3cA==
				) ; KSK; alg = ECDSAP256SHA256 ; key id = <KSK_Id>
<domaine.name>.	43200 IN DNSKEY	256 3 13 (
				RcFlnT/aqL+UNcrLlSe5DFRuX5Srhie5UYkNbnm+5J4rZE
				3qRTKSQqqpKrxb4XwtdsSZ1wl5zixer3XR2ngXqPSw==
				) ; ZSK; alg = ECDSAP256SHA256 ; key id = <ZSK_Id>
<domaine.name>.	43200 IN RRSIG DNSKEY 13 4 86400 (
				<expiration_date> <creation_date> 20998 <domaine.name>.
				XPTzd2+tTxVfhVrz2+haiqLKdfXx5QyWPwFfi+utUKTK5oPGf
				1WwdRdwDy3Pu8P7Wc55ZBEaqyayM+BJsUGPp2XBnovAXEpqvQ== )
<domaine.name>.	43200 IN RRSIG DNSKEY 13 4 86400 (
				<expiration_date> <creation_date> 61619 <domaine.name>.
				3fac0v2znWPzv777Wc55ZBi6yTZTf7Wc55ZB4N6ckds8VjZqIlq
				3kpRF3texF4bZi2zh4Bw2o1CuWPwFfi+5kJfh0lzfg== )

;; Query time: 359 msec
;; SERVER: 9.9.9.9#53(9.9.9.9)
;; WHEN: Thu Jan 20 22:08:13 CET 2022
;; MSG SIZE  rcvd: 435
Le fournisseur de zone de nom de domaine supérieur peut avoir un peu de délai avant de procéder à l'enregistrement.
Renouvellement des dates d'expiration
Manuellement
On renouvelle les clés :
dnssec-signzone -o <domain.name> -k /var/named/K<domain.name>.+013+<KSK_Id>.key /var/named/zone.<domain.name> /var/named/K<domain.name>.+013+<ZSK_Id>.key
Verifying the zone using the following algorithms: ECDSAP256SHA256.
Zone fully signed:
Algorithm: ECDSAP256SHA256: KSKs: 1 active, 0 stand-by, 0 revoked
                            ZSKs: 1 active, 0 stand-by, 0 revoked
zone.<domain.name>.signed
On relance Bind9 :
systemctl reload named.service
Script
#!/bin/bash

declare -r ZONE_KEY_DIRECTORY="/var/named/"

declare -a ZONE_DOMAINS=("<domain1.name>" "<domain2.name>")
declare -a ZONE_NAMES=("zone.<domain1.name>" "zone.<domain2.name>")
declare -a ZONE_KEYS_KSK=("K<domain1.name>.+xxx+xxxxx.key" "K<domain2.name>.+xxx+xxxxx.key")
declare -a ZONE_KEYS_ZSK=("K<domain1.name>.+xxx+xxxxx.key" "K<domain2.name>.+xxx+xxxxx.key")

cd $ZONE_KEY_DIRECTORY || exit 1

# Loop on domain name zones
for (( i=0; i < "${#ZONE_DOMAINS[@]}"; i++ ));
do
    # Search for serial number
	SERIAL=$(grep -Po '\d{10}(?= {3}; sn)' "${ZONE_NAMES[$i]}")
	if [[ ! "$SERIAL" =~ ^[[:digit:]]+$ ]]; then exit 1; fi
	SERIAL_NEW=$((SERIAL + 1))
    # Increment serial number
	sed -i "s/""$SERIAL""/""$SERIAL_NEW""/" "${ZONE_NAMES[$i]}"

	/usr/sbin/dnssec-signzone -o "${ZONE_DOMAINS[$i]}" -k "${ZONE_KEYS_KSK[$i]}" "${ZONE_NAMES[$i]}" "${ZONE_KEYS_ZSK[$i]}"
	EXIT_CODE=$?

	if [ $EXIT_CODE -eq 0 ];
	then
		echo "Renew is done correctly for ${ZONE_DOMAINS[$i]}! (SN: $SERIAL_NEW)"
	else
		echo "Something went wrong with ${ZONE_DOMAINS[$i]}… (SN: $SERIAL_NEW)"
		exit 1
	fi
done

systemctl reload named.service
EXIT_CODE=$?
if [ $EXIT_CODE -eq 0 ];
then
	echo "Everything seems correct."
	exit 0
else
	echo "There is an error with Bind!!!"
	exit 1
fi
On lance un cronjob :
0 4 25 * * /bin/sh /root/.scripts/renew-dnskey.sh
Différentes sources ou ressources
- DNSSEC Guide — BIND 9 documentation - #Semi automatic signing
- DNSSEC Guide — BIND 9 documentation - #Setting key timing information
- DNSSEC Guide — BIND 9 documentation - #Manual signing
- How To Setup DNSSEC on an Authoritative BIND DNS Server DigitalOcean - #Modifying zone records
- DNSSEC - Signer la zone DNS de l'Active Directory
Configurer IPv6 sur un VPS OVH sous Red Hat Family
Obtenir les informations nécessaires
Il y a deux façons de faire…
Panneau de contrôle
Se connecter au panneau de contrôle de son compte : OVHcloud Control Panel. Puis récuperer l'IPv6 et le Gateway.
API OVHCloud
Se rendre sur la console https://API.OVH.com.
- Dans la section GET /vps/{serviceName}/ips récupérer l'IPv6 du VPS.
- Dans la section GET /vps/{serviceName}/ips/{ipAddress} récupérer le Gateway.
Appliquer la configuration IPv6
La configuration de réseau se trouve dans le fichier /etc/sysconfig/network-scripts/ifcfg-eth0. Il est conseillé de faire une sauvegarde…
Copie de sauvegarde
sudo mkdir /etc/sysconfig/network-scripts/backup
cp /etc/sysconfig/network-scripts/ifcfg-eth0 /etc/sysconfig/network-scripts/backup/ifcfg-eth0.bak
Éditer le fichier
sudo vim /etc/sysconfig/network-scripts/ifcfg-eth0
Ajouter les informations suivantes :
IPV6INIT=yes
IPV6ADDR=<YOUR_IPV6>/<IPV6_PREFIX>
IPV6_DEFAULTGW=<IPV6_GATEWAY>
Normalement l'IPV6_PREFIX est 128.
Relancer le service de réseau
sudo systemctl restart NetworkManager
Vérification
Sur le serveur
ip -6 addr show eth0
Depuis un autre ordinateur
ping6 <YOUR_IPV6>
Depuis un navigateur
Si le serveur écoute sur le port 80 ou 443, entrer l'adresse IPv6 entre crochets ([YOUR_IPV6]) dans la barre d'adresse.
Désactiver le Cloud-init
Le Cloud-init permet lancer un script au démarrage des VPS, notamment pour gérer le hostname, le resolve.conf ou le partitionnement automatique en cas de redimentionnement.
echo "network: {config: disabled}" | sudo tee /etc/cloud/cloud.cfg.d/98-disable-network-config.cfg
Pour retrouver une gestion automatique, il suffit de supprimer le fichier, changer l'extension ou le déplacer.
Source
- Configuring IPv6 on a VPS OVH Guides.
- How to Restart Network Service on CentOS 8 or RHEL 8 – TecAdmin.
Configurer un serveur DNS avec BIND sous CentOS 8 🇫🇷
Tuto depuis blog.microlinux.fr.
Installation
$ sudo yum install bind bind-utils
Serveur cache DNS
- On fait une sauvegarde de fichier d'origine.
- On édite un nouveau fichier named.conf
$ sudo mv /etc/named.conf /etc/named.conf.orig
$ sudo vim /etc/named.conf
// etc/named.conf
options {
  directory "/var/named";
};

// journalisation propre à BIND
logging {
  channel single_log {
    file "/var/log/named/named.log" versions 3 size 2m;
    severity info;
    print-time yes;
    print-severity yes;
    print-category yes;
  };
  category default {
    single_log;
  };
};

zone "." IN {
  type hint;
  file "named.ca";
};

include "/etc/named.rfc1912.zones";
// zone DNS afin de déclarer en serveur maître primaire
include "/etc/named.conf.local";
- On attribut user:group du fichier.
- On règle les permissions du fichier.
- On active et démarre BIND.
- On vérifie si le service tourne correctement.
$ sudo chown root:named /etc/named.conf
$ sudo chmod 0640 /etc/named.conf
$ sudo systemctl enable named --now
$ systemctl status named
● named.service - Berkeley Internet Name Domain (DNS)
   Loaded: loaded (/usr/lib/systemd/system/named.service; enabled; vendor preset: disabled)
   Active: active (running) since Mon 2021-01-11 14:31:42 CET; 1 day 1h ago
Configurer la journalisation
Comme vu précédemment, la journalisation propre à BIND a été mise en place. Cependant, il ne peut pas créer ce fichier à la volée.
On le crée à sa place en attribuant les permissions correctes.
$ sudo mkdir /var/log/named
$ sudo touch /var/log/named/named.log
$ sudo chown -R named:named /var/log/named/
$ sudo chmod 0770 /var/log/named
- Avec SELinux en mode renforcé, on réétiquette le répertoire.
- On recharge la configuration de BIND.
$ sudo restorecon -R -v /var/log/named
$ sudo systemctl reload named
Serveur maître primaire
$ sudo vim /etc/named.conf.local
zone "<domaine.name>" {
  type master;
  file "zone.<domaine.name>";
};
On attribue les mêmes permissions que named.conf.
$ sudo chown root:named /etc/named.conf.local
$ sudo chmod 0640 /etc/named.conf.local
On édite le fichier zone.<domaine.name>.
$ sudo vim /var/named/zone.<domaine.name>
; /var/named/zone.<domaine.name>
$TTL 86400
$ORIGIN <domaine.name>.
@ IN SOA ns.<domaine.name>. <nom>.<domaine.name>. (
   2021011201   ; sn: serial number must be incremented each time
        10800   ; refresh (3 heures)
          600   ; retry (10 minutes)
      1814400   ; expiry (3 semaines)
        10800 ) ; minimum (3 heures)
					IN      NS      ns.<domaine.name>.
ownercheck			IN      TXT     "<hash>" ; to check owner with provider
<domaine.name>.		IN      AAAA    2001:41d0:305:2100::100e
<domaine.name>.		IN      A       51.38.177.69
ns					IN      AAAA    2001:41d0:305:2100::100e
ns					IN      A       51.38.177.69
shaarli				IN      AAAA    2001:41d0:305:2100::100e
shaarli				IN      A       51.38.177.69
www					IN      CNAME   <domaine.name>.
www.shaarli			IN      CNAME   shaarli
La partie
<nom>.<domaine.name>.correspond à une adresse e-mail joignable. Étant donné que le@à une signification particulière dans le fichier de configuration, il est substitué par un point (.). Si l'adresse e-mail contient un permier point de séparation (exemplejean.dupond@example.com) il doit être échappé (jean\.dupond.example.com).Source : SOA Record Explained How to Perform an SOA Record Check (+Example) - IONOS
- On règle les droits de propriétés.
- On règle les permissions qui vont bien.
- On vérifie la définition correcte de la zone.
- On recharge la configuration de BIND.
- On refait une expansion des certificats au besoin.
$ sudo chown root:named /var/named/zone.<domaine.name>
$ sudo chmod 0640 /var/named/zone.<domaine.name>
$ sudo named-checkzone <domaine.name> /var/named/zone.<domaine.name>
zone <domaine.name>/IN: loaded serial 2021011201
OK
$ sudo systemctl reload named
$ sudo certbot --nginx # Si certbot est bien installé
Create swape file 🇬🇧
Tuto from itsfoss.com and linuxhandbook.com.
Check swap space in Linux
$ free -h
              total        used        free      shared  buff/cache   available
Mem:          1,7Gi       844Mi       321Mi        18Mi       603Mi       759Mi
Swap:            0B          0B          0B
There is no swap space.
Make a new swap file
- Use the fallocate command to create a file of size 1 GB.
- It is recommended to allow only root to read and write to the swap file.
$ sudo fallocate -l 1G /swapfile
$ sudo chmod 600 /swapfile
The name of the swap file could be anything.
Mark the new file as swap space
$ sudo mkswap /swapfile
Configure l'espace d'échange (swap) en version 1, taille = 1024 MiB (1073737728 octets)
pas d'étiquette, UUID=3bbb4a53-e2a4-495f-8e42-d7cb43e6ad40
Enable the swap file
- Enable the swap file.
- Check the swap space.
$ sudo swapon /swapfile
$ swapon --show
NAME      TYPE  SIZE USED PRIO
/swapfile file 1024M   0B   -2
Make the changes permanent
- It’s always a good idea to make a backup before make any changes to the /etc/fstab file.
- Add the line to the end of /etc/fstab file.
$ sudo cp /etc/fstab /etc/fstab.back
Change Swapiness kernel parameter
Temporary change
Check swapiness:
cat /proc/sys/vm/swappiness
Change setting:
sudo sysctl vm.swappiness=10
Persistent change
Edit the config file:
sudo vim /etc/sysctl.conf
Set swapiness:
# /etc/sysctl.conf
vm.swappiness=10
Reload sysctl:
sudo sysctl -p
[Bonus] Resize swap file
Make sure the swapfile is on the system and not a swap partition.
$ swapon --show
NAME      TYPE SIZE USED PRIO
/swapfile file   1G   0B   -2
Now before you resize the swap file, you should turn the swap off.
You should also make sure that you have enough free RAM available to take the data from swap file.
Otherwise, create a temporary swap file.
A solution to clear swapfile is to reboot the system…
Disable the swapfile.
$ sudo swapoff /swapfile
Now, use the fallocate to change the size of the swap file.
$ sudo fallocate -l 2G /swapfile
Mark the file as a swap file.
$ sudo mkswap /swapfile
mkswap: /swapfile : avertissement : effacement de l'ancienne signature swap.
Configure l'espace d'échange (swap) en version 1, taille = 2 GiB (2147479552 octets)
pas d'étiquette, UUID=bf273c02-f44a-48ef-9b04-b212d9003a4a
Enable the swap file.
$ sudo swapon /swapfile
Check!
$ free -h
              total        used        free      shared  buff/cache   available
Mem:          1,7Gi       1,0Gi       138Mi        65Mi       619Mi       541Mi
Swap:         2,0Gi       0,0Ki       2,0Gi
Insérer sa vérification Mastodon dans BookStack 🇫🇷
Contexte
D'après la documentation de Mastodon :
Vérification
Vous pouvez vous vérifier en tant que propriétaire des liens dans les métadonnées de votre profil. Pour cela, le site web lié doit contenir un lien vers votre profil Mastodon. Le lien de retour doit avoir un attribut rel="me" . Le texte du lien n’a pas d’importance.
Or l'ajout de liens de page dans les préférences de Bookstack ajoute l'attribut rel="noopener" et c'est tout…
Manipulation
Préférence de Mastodon
- Se rendre dans les préférences de son profil.
- Dans les options de Métadonnées du profil, ajouter le nom de l'élément puis le lien internet vers son BookStack.
- Enregistrer les préférences.
Préférences de BookStack
- Se rendre dans les préférences de l'appli.
- Ajouter le libellé du lien ainsi que l'URL correspondante à son profil Mastodon (exple : « https://mstdn.fr/@mickge »).
- Enregistrer les préférences.
Sur le serveur
Utiliser la personnalisation d'après la doc.
Créer un dossier de thème personnalisé avec le dossier qui vont bien aller et y copier le fichier footer.blade.php :
sudo -u www-data sh -c "mkdir -p <racine>/themes/my_theme/common && cp <racine>/resources/views/common/footer.blade.php <racine>/themes/my_theme/common/"
Modifier le fichier <racine>/themes/my_theme/common/footer.blade.php à la ligne 4 par les lignes suivantes :
[…]
        <a href="{{ $link['url'] }}" target="_blank"
        @if(strpos(strtolower($link['label']), 'mastodon') !== false)
            rel="noopener me"
        @else
            rel="noopener"
        @endif
        >{{ strpos($link['label'], 'trans::') === 0 ? trans(str_replace('trans::', '', $link['label'])) : $link['label'] }}</a>
[…]
Ensuite, changer la variable de thème en ajoutant dans le fichier <racine>/.env :
# Custom Theme
APP_THEME=my_theme
That's it!
Installation de Certbot 🇫🇷
⚠️ Vérifier que le mode opératoire est toujours valable…
Installation de snap
- On installe
snapd. - On rend opérationnel maintenant le moteur de
snap. - On crée un lien symbolique.
$ sudo dnf upgrade && sudo dnf install snapd
$ sudo systemctl enable --now snapd.socket
$ sudo ln -s /var/lib/snapd/snap /snap
Installation de certbot
$ sudo snap install core; sudo snap refresh core
$ sudo dnf remove certbot # On s'assure que l'ancien certbot est bien désintallé
$ sudo snap install --classic certbot
$ sudo ln -s /snap/bin/certbot /usr/bin/certbot
$ sudo certbot --nginx
Site officiel ici avec les étapes sous RHEL8 & nginx.
Recevoir un e-mail lors d'une connection SSH
Création du script
Évidemment, il faut que le serveur soit en mesure d'envoyer des e-mails…
(Par exemple sudo apt install mailutils sur Debian Family.)
sudo vim /usr/local/bin/send-mail-on-ssh-login.sh
Remplacer <EMAIL_ADDRESS> par l'adresse de destination voulue.
#!/bin/sh
if [ "$PAM_TYPE" != "open_session" ]
then
  exit 0
else
  {
    echo "User: $PAM_USER"
    echo "Remote Host: $PAM_RHOST"
    echo "Service: $PAM_SERVICE"
    echo "TTY: $PAM_TTY"
    echo "Date: `date`"
    echo "Server: `uname -a`"
  } | mail -s "$PAM_SERVICE login on `hostname -s` for account $PAM_USER" <EMAIL_ADDRESS>
fi
exit 0
Rendre le script exécutable.
sudo chmod +x /usr/local/bin/send-mail-on-ssh-login.sh
Configurer le PAM (Pluggable Authentication Modules)
sudo vim /etc/pam.d/sshd
session optional pam_exec.so /usr/local/bin/send-mail-on-ssh-login.sh
Sources
Script de sauvegarde avec Borg
Pour faire mes sauvegardes j'utilise BorgBackup. Les données sont envoyées sur un serveur de sauvegarde.
Les sauvegardes ont lieu quatre fois par jour en lançant le script dans un cronjob. S'en suit la réception d'un e-mail à chaque sauvegarde.
Au passage, une fois par jour, le script vérifie les mises à jour disponibles.
#!/bin/sh

export BORG_PASSPHRASE='<BORG_PASSPHRASE>'

# some helpers and error handling:
printMessage() { printf "\n*** %s => %s ***\n\n" "$( date +"%A %d %B %T" )" "$*" >&2; }
trap 'echo $( date ) Backup interrupted >&2; exit 2' INT TERM

printMessage "Starting mysql backup"

mysqldump --defaults-file=<variables_file_path> --all-databases > <output_file_path>

printMessage "Starting backup"

/usr/bin/borg create                            \
        --stats                                 \
        --filter=AME                            \
        --compression auto,zstd,10              \
        --exclude-caches                        \
        --exclude='/var/lib/{snapd,selinux}'    \
        <backup_server_url>:repo::{now} \
        /var/{www,lib}                          \
        /root                                   \
        /etc                                    \
        /home

backup_exit=$?

printMessage "Pruning repository"

# Use the `prune` subcommand to maintain 7 daily, 2 weekly and 2 monthly
# archives of THIS machine. The '{hostname}-' prefix is very important to
# limit prune's operation to this machine's archives and not apply to
# other machines' archives also:

borg prune                                      \
    --list                                      \
    --show-rc                                   \
    --keep-hourly       3                       \
    --keep-daily        7                       \
    --keep-weekly       2                       \
    --keep-monthly      2                       \
    --save-space                                \
    <backup_server_url>:repo

prune_exit=$?

# use highest exit code as global exit code
global_exit=$(( backup_exit > prune_exit ? backup_exit : prune_exit ))

if [ ${global_exit} -eq 0 ]; then
    printMessage "Backup and Prune finished successfully"
elif [ ${global_exit} -eq 1 ]; then
    printMessage "Backup and/or Prune finished with warnings"
else
    printMessage "Backup and/or Prune finished with errors"
fi

if [ $(date "+%H") -eq 6 ] ; then
    printMessage "Check updates"
    dnf check-update
fi

exit ${global_exit}